2015-01-24, 22:37
Reading CSV files is pretty easy in LaTeX, thanks to Nicola Talbot’s datatool package.
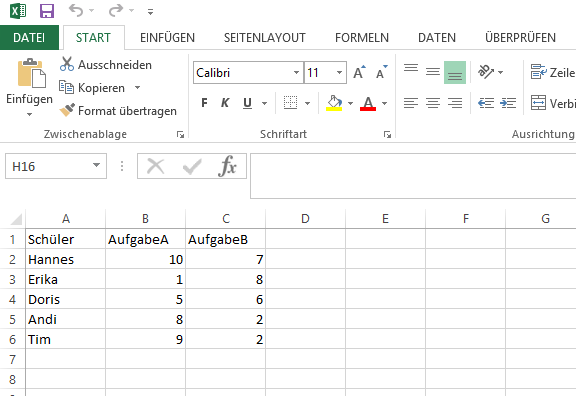
When you have an Excel file like the following Schueler.xlsx, simply save it as CSV (Comma-Separated Value).
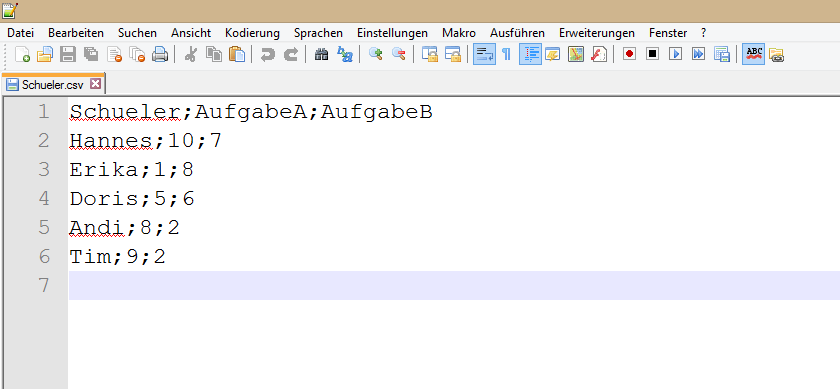
If you open the CSV file „Schueler.csv“ in a text editor you get the following:
We start by loading the datatool package. Since the German Excel uses semicolons as column separator, we are required to manually set the delimiter. In the next line we tell LaTeX to use our Schueler.csv file and to reference it as „scores“. In the DTLforeach commands the magic happens. The command has three parameters:
- the file reference
- the assignment of the file headers to LaTeX commands
- the loop where the output for each row is defined
\documentclass[12pt,ngerman]{scrartcl}
\usepackage[utf8]{inputenc}
\usepackage[T1]{fontenc}
\usepackage{babel}
\usepackage{datatool}
\DTLsetseparator{;}
\DTLloaddb{scores}{Schueler.csv}
\begin{document}
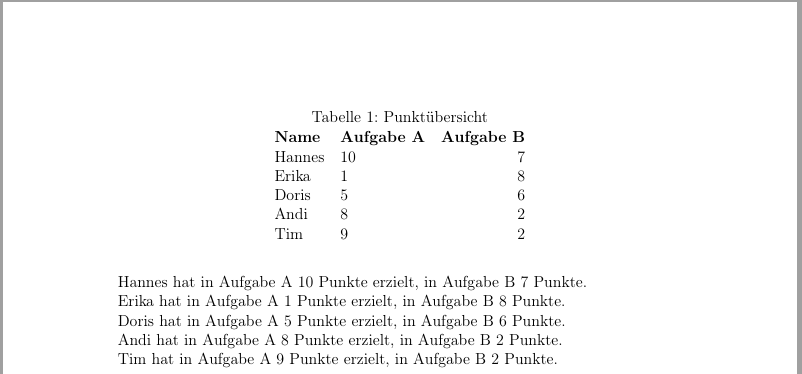
\begin{table}
\caption{Punktübersicht}
\centering
\begin{tabular}{llr}
\bfseries Name &
\bfseries Aufgabe A &
\bfseries Aufgabe B %
\DTLforeach{scores}{%
\name=Schueler,\aufgabea=AufgabeA,\aufgabeb=AufgabeB}{%
\\
\name & \aufgabea & \aufgabeb }
\end{tabular}
\end{table}
\DTLforeach{scores}{%
\name=Schueler,\aufgabea=AufgabeA,\aufgabeb=AufgabeB}{%
\name\ hat in Aufgabe A \aufgabea~Punkte erzielt, in Aufgabe B \aufgabeb~Punkte.}
\end{document}
Uwe Ziegenhagen likes LaTeX and Python, sometimes even combined.
Do you like my content and would like to thank me for it? Consider making a small donation to my local fablab, the Dingfabrik Köln. Details on how to donate can be found here Spenden für die Dingfabrik.
More Posts - Website
2015-01-24, 22:37
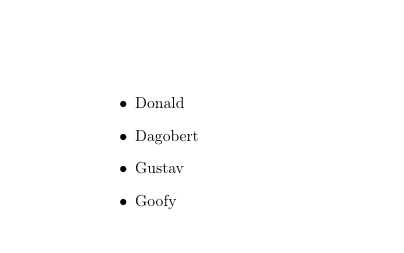
Here’s a fairly easy example how to loop through a LaTeX collection/list with the help of the pgffor package
\documentclass[12pt,ngerman]{scrartcl}
\usepackage[utf8]{inputenc}
\usepackage[T1]{fontenc}
\usepackage{babel}
\usepackage{pgffor}
\begin{document}

\begin{itemize}
\foreach \x in {Donald,Dagobert,Gustav,Goofy} {\item \x}
\end{itemize}

\end{document}
Uwe Ziegenhagen likes LaTeX and Python, sometimes even combined.
Do you like my content and would like to thank me for it? Consider making a small donation to my local fablab, the Dingfabrik Köln. Details on how to donate can be found here Spenden für die Dingfabrik.
More Posts - Website
2015-01-11, 11:47
Die Oster-Formel der Wikipedia kann man recht einfach in einem Python-Algorithmus nutzen:
import datetime

def calcEaster(jahr):
	a = jahr % 19
	b = jahr % 4
	c = jahr % 7
	k = jahr / 100

	p = (8 * k  + 13) / 25
	q = k / 4
	M = (15 + k - p - q) % 30
	d = (19 * a + M) % 30
	N = (4 + k - q) % 7
	e = (2 * b + 4 * c + 6 * d + N) % 7

	Ostermontag = (22 + d + e) - 1

	start = datetime.datetime.strptime("01.03." + str(jahr), "%d.%m.%Y")
	easter = start + datetime.timedelta(days=round(Ostermontag))
	return easter.strftime('%d.%m.%Y')

for i in range(2014,2050):
print(calcEaster(i)) |
import datetime
def calcEaster(jahr):
a = jahr % 19
b = jahr % 4
c = jahr % 7
k = jahr / 100
p = (8 * k + 13) / 25
q = k / 4
M = (15 + k - p - q) % 30
d = (19 * a + M) % 30
N = (4 + k - q) % 7
e = (2 * b + 4 * c + 6 * d + N) % 7
Ostermontag = (22 + d + e) - 1
start = datetime.datetime.strptime("01.03." + str(jahr), "%d.%m.%Y")
easter = start + datetime.timedelta(days=round(Ostermontag))
return easter.strftime('%d.%m.%Y')
for i in range(2014,2050):
print(calcEaster(i))
Ergänzung: Das Osterparadoxon ist nicht berücksichtigt!
Uwe Ziegenhagen likes LaTeX and Python, sometimes even combined.
Do you like my content and would like to thank me for it? Consider making a small donation to my local fablab, the Dingfabrik Köln. Details on how to donate can be found here Spenden für die Dingfabrik.
More Posts - Website
2014-12-27, 14:08
Hier ein eingedeutschtes Beispiel für die exam Klasse, mit der sich recht einfach Klausuren setzen lassen.
Edit 30.12.2014: Nach Hinweisen von Axel Kielhorn habe ich das Beispiel noch erweitert.
\documentclass[addpoints,a4paper,ngerman,12pt,answers]{exam}
\usepackage{babel}
\usepackage[a4paper,top=2.5cm,bottom=3cm,left=2.5cm,right=2cm]{geometry}
\usepackage[utf8]{inputenc}
\usepackage[T1]{fontenc}
\usepackage{booktabs}
\usepackage{graphicx}
\usepackage{csquotes}
\usepackage{paralist}
\usepackage{wasysym}
\usepackage[math]{iwona}
\pointpoints{Punkt}{Punkte}
\bonuspointpoints{Bonuspunkt}{Bonuspunkte}
\renewcommand{\solutiontitle}{\noindent\textbf{Lösung:}\enspace}
\chqword{Frage}
\chpgword{Seite}
\chpword{Punkte}
\chbpword{Bonus Punkte}
\chsword{Erreicht}
\chtword{Gesamt}
\checkboxchar{\Square}
\checkedchar{\CheckedBox}
\pagestyle{headandfoot}
\runningheadrule
\firstpageheader{Links oben}{Mitte oben}{\today}
\runningheader{Links oben}{Mitte oben}{\today}
\firstpagefooter{Links unten}{Mitte unten}{\thepage\,/\,\numpages}
\runningfooter{Links unten}{Mitte unten}{\thepage\,/\,\numpages}
\begin{document}
\vspace*{3em}
\makebox[\textwidth]{Name:\enspace\hrulefill}
\vspace*{2em}
\makebox[\textwidth]{Matrikelnummer:\enspace\hrulefill}
\vspace*{3em}
\begin{questions}
\question[4] Warum gibt es Luft?
\begin{solution}
Damit wir atmen können.
\end{solution}
\bonusquestion[2] Wieviel Luft gibt es?
\begin{solution}
Ziemlich viel.
\end{solution}
\question[5] Warum gibt es Sauerstoff?
\clearpage
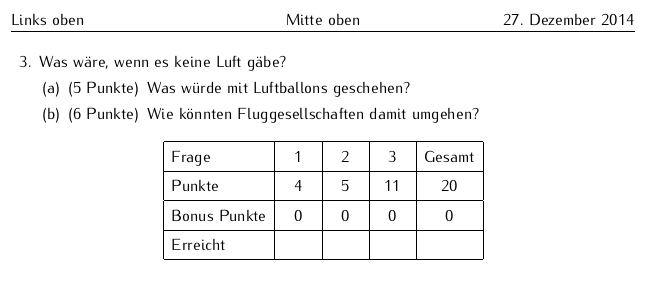
\question Was wäre, wenn es keine Luft gäbe?
\begin{parts}
\part[5] Was würde mit Luftballons geschehen?
\bonuspart[6] Wie könnten Fluggesellschaften damit umgehen?
\end{parts}
\question [100] Wird es morgen schneien?
\begin{checkboxes}
\CorrectChoice Ja
\choice Nein
\choice Vielleicht
\end{checkboxes}
\question Ein Name der folgenden Reihe passt nicht zu den anderen. Welcher?
\begin{oneparchoices}
\choice Donald
\choice Dagobert
\choice Daisy
\choice Micky
\CorrectChoice Balu
\end{oneparchoices}
\end{questions}
\begin{center}
\combinedgradetable[h][questions]
\end{center}
\end{document} |
\documentclass[addpoints,a4paper,ngerman,12pt,answers]{exam}
\usepackage{babel}
\usepackage[a4paper,top=2.5cm,bottom=3cm,left=2.5cm,right=2cm]{geometry}
\usepackage[utf8]{inputenc}
\usepackage[T1]{fontenc}
\usepackage{booktabs}
\usepackage{graphicx}
\usepackage{csquotes}
\usepackage{paralist}
\usepackage{wasysym}
\usepackage[math]{iwona}
\pointpoints{Punkt}{Punkte}
\bonuspointpoints{Bonuspunkt}{Bonuspunkte}
\renewcommand{\solutiontitle}{\noindent\textbf{Lösung:}\enspace}
\chqword{Frage}
\chpgword{Seite}
\chpword{Punkte}
\chbpword{Bonus Punkte}
\chsword{Erreicht}
\chtword{Gesamt}
\checkboxchar{\Square}
\checkedchar{\CheckedBox}
\pagestyle{headandfoot}
\runningheadrule
\firstpageheader{Links oben}{Mitte oben}{\today}
\runningheader{Links oben}{Mitte oben}{\today}
\firstpagefooter{Links unten}{Mitte unten}{\thepage\,/\,\numpages}
\runningfooter{Links unten}{Mitte unten}{\thepage\,/\,\numpages}
\begin{document}
\vspace*{3em}
\makebox[\textwidth]{Name:\enspace\hrulefill}
\vspace*{2em}
\makebox[\textwidth]{Matrikelnummer:\enspace\hrulefill}
\vspace*{3em}
\begin{questions}
\question[4] Warum gibt es Luft?
\begin{solution}
Damit wir atmen können.
\end{solution}
\bonusquestion[2] Wieviel Luft gibt es?
\begin{solution}
Ziemlich viel.
\end{solution}
\question[5] Warum gibt es Sauerstoff?
\clearpage
\question Was wäre, wenn es keine Luft gäbe?
\begin{parts}
\part[5] Was würde mit Luftballons geschehen?
\bonuspart[6] Wie könnten Fluggesellschaften damit umgehen?
\end{parts}
\question [100] Wird es morgen schneien?
\begin{checkboxes}
\CorrectChoice Ja
\choice Nein
\choice Vielleicht
\end{checkboxes}
\question Ein Name der folgenden Reihe passt nicht zu den anderen. Welcher?
\begin{oneparchoices}
\choice Donald
\choice Dagobert
\choice Daisy
\choice Micky
\CorrectChoice Balu
\end{oneparchoices}
\end{questions}
\begin{center}
\combinedgradetable[h][questions]
\end{center}
\end{document}
Uwe Ziegenhagen likes LaTeX and Python, sometimes even combined.
Do you like my content and would like to thank me for it? Consider making a small donation to my local fablab, the Dingfabrik Köln. Details on how to donate can be found here Spenden für die Dingfabrik.
More Posts - Website
Category:
LaTeX,
Pakete |
Kommentare deaktiviert für Deutsches Beispiel für die „exam“ Dokumentenklasse
2014-12-14, 18:53
Today I had to TeX a longer file with numerous \cite[somestuff]{citekey} sequences, of which some had hard-to-spot errors (some ‚]‘ were missing). The following Python script checks if each \cite command has matching '[]' and '{}' sequences. I’ll probably extend this script to accept simple \cite{citekey} sequences that have no optional parameter.
#!/usr/bin/python
import re

with open('filetocheck.tex') as f:
	content = f.readlines()

index = 0

for a in content:
	index = index + 1
	if "cite"  in a: # check only lines that contain 'cite'
		matches = re.search(r'(.*)\[(.*)\]\{(.*)\}',a) # search for <sometext>[<sometext>]{<sometext>}
		if not matches:
print (">>> Fail in row" , str(index), a) |
#!/usr/bin/python
import re
with open('filetocheck.tex') as f:
content = f.readlines()
index = 0
for a in content:
index = index + 1
if "cite" in a: # check only lines that contain 'cite'
matches = re.search(r'(.*)\[(.*)\]\{(.*)\}',a) # search for <sometext>[<sometext>]{<sometext>}
if not matches:
print (">>> Fail in row" , str(index), a)
Uwe Ziegenhagen likes LaTeX and Python, sometimes even combined.
Do you like my content and would like to thank me for it? Consider making a small donation to my local fablab, the Dingfabrik Köln. Details on how to donate can be found here Spenden für die Dingfabrik.
More Posts - Website
2014-12-14, 16:27
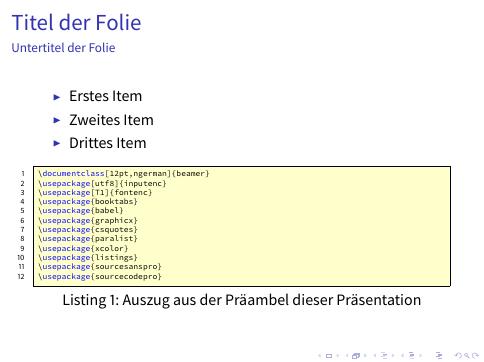
Here’s a short example for a Beamer slide template using the Adobe Source Sans fonts.
\documentclass[12pt,ngerman]{beamer}
\usepackage[utf8]{inputenc}
\usepackage[T1]{fontenc}
\usepackage{booktabs}
\usepackage{babel}
\usepackage{graphicx}
\usepackage{csquotes}
\usepackage{paralist}
\usepackage{xcolor}
\usepackage{listings}
\usepackage{sourcesanspro}
\usepackage{sourcecodepro}

\definecolor{colBack}{rgb}{1,1,0.8}
\definecolor{colKeys}{rgb}{0,0,1}
\definecolor{colIdentifier}{rgb}{0,0,0}
\definecolor{colComments}{rgb}{1,0,0}
\definecolor{colString}{rgb}{0,0.5,0}

\lstset{%
    float=hbp,%
    basicstyle=\ttfamily\footnotesize, %
    identifierstyle=\color{colIdentifier}, %
    keywordstyle=\color{colKeys}, %
    stringstyle=\color{colString}, %
    commentstyle=\color{colComments}, %
    columns=flexible, %
    tabsize=2, %
    frame=single, %
    extendedchars=true, %
    showspaces=false, %
    showstringspaces=false, %
    numbers=left, %
    numberstyle=\tiny, %
    breaklines=true, %
    backgroundcolor=\color{colBack}, %
    breakautoindent=true, %
    captionpos=b%
}

\author{Uwe Ziegenhagen}
\title{Titel der Präsentation}
\institute{Köln}

\begin{document}
\frame{
	\maketitle
}

\frame[containsverbatim]{
\frametitle{Titel der Folie}
\framesubtitle{Untertitel der Folie}

\begin{itemize}
\item Erstes Item
\item Zweites Item
\item Drittes Item
\end{itemize}

\lstinputlisting[language={[LaTeX]TeX},basicstyle=\ttfamily\tiny,linerange={1-12},caption={Auszug aus der Präambel dieser Präsentation},label={lis:tex01}]{\jobname.tex}
}

\end{document} |
\documentclass[12pt,ngerman]{beamer}
\usepackage[utf8]{inputenc}
\usepackage[T1]{fontenc}
\usepackage{booktabs}
\usepackage{babel}
\usepackage{graphicx}
\usepackage{csquotes}
\usepackage{paralist}
\usepackage{xcolor}
\usepackage{listings}
\usepackage{sourcesanspro}
\usepackage{sourcecodepro}
\definecolor{colBack}{rgb}{1,1,0.8}
\definecolor{colKeys}{rgb}{0,0,1}
\definecolor{colIdentifier}{rgb}{0,0,0}
\definecolor{colComments}{rgb}{1,0,0}
\definecolor{colString}{rgb}{0,0.5,0}
\lstset{%
float=hbp,%
basicstyle=\ttfamily\footnotesize, %
identifierstyle=\color{colIdentifier}, %
keywordstyle=\color{colKeys}, %
stringstyle=\color{colString}, %
commentstyle=\color{colComments}, %
columns=flexible, %
tabsize=2, %
frame=single, %
extendedchars=true, %
showspaces=false, %
showstringspaces=false, %
numbers=left, %
numberstyle=\tiny, %
breaklines=true, %
backgroundcolor=\color{colBack}, %
breakautoindent=true, %
captionpos=b%
}
\author{Uwe Ziegenhagen}
\title{Titel der Präsentation}
\institute{Köln}
\begin{document}
\frame{
\maketitle
}
\frame[containsverbatim]{
\frametitle{Titel der Folie}
\framesubtitle{Untertitel der Folie}
\begin{itemize}
\item Erstes Item
\item Zweites Item
\item Drittes Item
\end{itemize}
\lstinputlisting[language={[LaTeX]TeX},basicstyle=\ttfamily\tiny,linerange={1-12},caption={Auszug aus der Präambel dieser Präsentation},label={lis:tex01}]{\jobname.tex}
}
\end{document}

Uwe Ziegenhagen likes LaTeX and Python, sometimes even combined.
Do you like my content and would like to thank me for it? Consider making a small donation to my local fablab, the Dingfabrik Köln. Details on how to donate can be found here Spenden für die Dingfabrik.
More Posts - Website
Schlagwörter:
LaTeX,
Beamer Category:
LaTeX,
Artikel |
Kommentare deaktiviert für Beamer Slides Template using Source Sans Fonts
2014-11-15, 00:23
Here’s the probably last part of this series, the missing piece showing the calculation of MD5 files with Python:
# http://www.pythoncentral.io/hashing-files-with-python/
import hashlib
import os
import codecs

hasher = hashlib.md5()

def calcHash(filename):
	print("Filename:   " + filename)
	with open(filename, 'rb') as afile:
		buf = afile.read()
		hasher.update(buf)
		print("Calculated: " + hasher.hexdigest())
		md5file = (os.path.splitext(filename)[0]) + ".md5"
		writeMD5 = codecs.open(md5file, "wb", "utf-8-sig")
		writeMD5.write(hasher.hexdigest())

calcHash("e:/arara.log") |
# http://www.pythoncentral.io/hashing-files-with-python/
import hashlib
import os
import codecs
hasher = hashlib.md5()
def calcHash(filename):
print("Filename: " + filename)
with open(filename, 'rb') as afile:
buf = afile.read()
hasher.update(buf)
print("Calculated: " + hasher.hexdigest())
md5file = (os.path.splitext(filename)[0]) + ".md5"
writeMD5 = codecs.open(md5file, "wb", "utf-8-sig")
writeMD5.write(hasher.hexdigest())
calcHash("e:/arara.log")
Uwe Ziegenhagen likes LaTeX and Python, sometimes even combined.
Do you like my content and would like to thank me for it? Consider making a small donation to my local fablab, the Dingfabrik Köln. Details on how to donate can be found here Spenden für die Dingfabrik.
More Posts - Website
2014-11-13, 09:13
Following up on an article a few days ago here’s a script that creates a MD5 file.
# Uwe Ziegenhagen, 12.11.2014
# Reference: http://onlinemd5.com/

### Step A: Get the name of the file
# http://blogs.technet.com/b/heyscriptingguy/archive/2009/09/01/hey-scripting-guy-september-1.aspx
Function Get-FileName($initialDirectory)
{
 [System.Reflection.Assembly]::LoadWithPartialName("System.windows.forms") | Out-Null
$OpenFileDialog = New-Object System.Windows.Forms.OpenFileDialog
$OpenFileDialog.initialDirectory = $initialDirectory
$OpenFileDialog.filter = "All files (*.*)| *.*"
$OpenFileDialog.ShowDialog() | Out-Null
$OpenFileDialog.filename
} #end function Get-FileName

# *** Entry Point to Script ***
$file =  Get-FileName -initialDirectory "C:\"
# write-host "file: " $file

### Step B: Create a file handle from this string and calculate the MD5 sum
$filehandle = Get-ChildItem $file

write-host "Filename: " $filehandle.Name

# http://stackoverflow.com/questions/10521061/how-to-get-an-md5-checksum-in-powershell
$md5 = New-Object -TypeName System.Security.Cryptography.MD5CryptoServiceProvider
$hash = [System.BitConverter]::ToString($md5.ComputeHash([System.IO.File]::ReadAllBytes($filehandle))).ToLower().Replace("-","")

write-host "Calculated Hashsum: "  $hash

### Step C: Write the MD5 sum from the MD5 sum file matching the other filename
$hash | out-file -FilePath $($filehandle.DirectoryName + "\" + $filehandle.BaseName + ".md5") |
# Uwe Ziegenhagen, 12.11.2014
# Reference: http://onlinemd5.com/
### Step A: Get the name of the file
# http://blogs.technet.com/b/heyscriptingguy/archive/2009/09/01/hey-scripting-guy-september-1.aspx
Function Get-FileName($initialDirectory)
{
[System.Reflection.Assembly]::LoadWithPartialName("System.windows.forms") | Out-Null
$OpenFileDialog = New-Object System.Windows.Forms.OpenFileDialog
$OpenFileDialog.initialDirectory = $initialDirectory
$OpenFileDialog.filter = "All files (*.*)| *.*"
$OpenFileDialog.ShowDialog() | Out-Null
$OpenFileDialog.filename
} #end function Get-FileName
# *** Entry Point to Script ***
$file = Get-FileName -initialDirectory "C:\"
# write-host "file: " $file
### Step B: Create a file handle from this string and calculate the MD5 sum
$filehandle = Get-ChildItem $file
write-host "Filename: " $filehandle.Name
# http://stackoverflow.com/questions/10521061/how-to-get-an-md5-checksum-in-powershell
$md5 = New-Object -TypeName System.Security.Cryptography.MD5CryptoServiceProvider
$hash = [System.BitConverter]::ToString($md5.ComputeHash([System.IO.File]::ReadAllBytes($filehandle))).ToLower().Replace("-","")
write-host "Calculated Hashsum: " $hash
### Step C: Write the MD5 sum from the MD5 sum file matching the other filename
$hash | out-file -FilePath $($filehandle.DirectoryName + "\" + $filehandle.BaseName + ".md5")
Uwe Ziegenhagen likes LaTeX and Python, sometimes even combined.
Do you like my content and would like to thank me for it? Consider making a small donation to my local fablab, the Dingfabrik Köln. Details on how to donate can be found here Spenden für die Dingfabrik.
More Posts - Website
Schlagwörter:
Powershell,
MD5 Category:
Allgemein |
Kommentare deaktiviert für Using Powershell to create MD5 files
2014-11-07, 19:23
Today I needed to split an integer (representing a bitmask) into its components, each component in a separate column. The following code from http://www.sqlservercentral.com/Forums/Topic1101943-392-1.aspx did the trick.
SELECT
   N,
   SIGN(N & 1) AS Bit1,
   SIGN(N & 2) AS Bit2,
   SIGN(N & 4) AS Bit3,
   SIGN(N & 8) AS Bit4,
   SIGN(N & 16) AS Bit5,
   SIGN(N & 32) AS Bit6,
   SIGN(N & 64) AS Bit7,
   SIGN(N & 128) AS Bit8
FROM (
   SELECT 511
) TestData(N) |
SELECT
N,
SIGN(N & 1) AS Bit1,
SIGN(N & 2) AS Bit2,
SIGN(N & 4) AS Bit3,
SIGN(N & 8) AS Bit4,
SIGN(N & 16) AS Bit5,
SIGN(N & 32) AS Bit6,
SIGN(N & 64) AS Bit7,
SIGN(N & 128) AS Bit8
FROM (
SELECT 511
) TestData(N)
Uwe Ziegenhagen likes LaTeX and Python, sometimes even combined.
Do you like my content and would like to thank me for it? Consider making a small donation to my local fablab, the Dingfabrik Köln. Details on how to donate can be found here Spenden für die Dingfabrik.
More Posts - Website
Category:
Programmierung,
SQL |
Kommentare deaktiviert für SQL: Splitting a Bitmask into separate columns
2014-11-06, 22:19
Here some Python code to calculate the MD5 hash for a given file:
# from http://www.pythoncentral.io/hashing-files-with-python/
import hashlib

hasher = hashlib.md5()
with open('e:/Mappe1.xlsx', 'rb') as afile:
    buf = afile.read()
    hasher.update(buf)
print(hasher.hexdigest()) |
# from http://www.pythoncentral.io/hashing-files-with-python/
import hashlib
hasher = hashlib.md5()
with open('e:/Mappe1.xlsx', 'rb') as afile:
buf = afile.read()
hasher.update(buf)
print(hasher.hexdigest())
Here the final script that provides the same functionality as the Powershell script I posted earlier today:
# http://www.pythoncentral.io/hashing-files-with-python/
import hashlib
import os
import codecs

hasher = hashlib.md5()

def calcHash(filename):
	print("Filename:   " + filename)
	with open(filename, 'rb') as afile:
		buf = afile.read()
		hasher.update(buf)
		print("Calculated: " + hasher.hexdigest())
		md5file = (os.path.splitext(filename)[0]) + ".md5"
		givenMD5 = codecs.open(md5file, "r", "utf-8-sig")
		print("Provided:   " + str(givenMD5.read()).lower())

calcHash("e:/Mappe1.xlsx") |
# http://www.pythoncentral.io/hashing-files-with-python/
import hashlib
import os
import codecs
hasher = hashlib.md5()
def calcHash(filename):
print("Filename: " + filename)
with open(filename, 'rb') as afile:
buf = afile.read()
hasher.update(buf)
print("Calculated: " + hasher.hexdigest())
md5file = (os.path.splitext(filename)[0]) + ".md5"
givenMD5 = codecs.open(md5file, "r", "utf-8-sig")
print("Provided: " + str(givenMD5.read()).lower())
calcHash("e:/Mappe1.xlsx")
Uwe Ziegenhagen likes LaTeX and Python, sometimes even combined.
Do you like my content and would like to thank me for it? Consider making a small donation to my local fablab, the Dingfabrik Köln. Details on how to donate can be found here Spenden für die Dingfabrik.
More Posts - Website