Author Archive

Programming Post-Commit Hooks for Subversion with Python

I am a regular user of Subversion, all my important TeX files are stored in a SVN repository. SVN has a few builtin hooks, which means at certain events certain scripts are called. The following templates can be found in the hooks subdirectory of the server repository:

  • post-commit.tmpl
  • post-lock.tmpl
  • post-revprop-change.tmpl
  • post-unlock.tmpl
  • pre-commit.tmpl
  • pre-lock.tmpl
  • pre-revprop-change.tmpl
  • pre-unlock.tmpl
  • start-commit.tmpl

It does not matter in what kind of language the scripts are written, Subversion only cares if an executable script (or *.exe file with this name) is present (remove ‚.tmpl‘ at the end of a script to activate it). Today, after reading http://palita.net/2011/08/24/svn-hooks-automatischer-checkout-nach-commits/, I was interested in writing a small Python script which notifies me if a commit has taken place. Based on some e-mail script from http://segfault.in/2010/12/sending-gmail-from-python/ and the argparse tutorial I managed to finish this script in just a few minutes. argparse is needed since Subversion calls the post-commit script with two parameters, the path to the repository and the version of the commit.

One note on the Google password: It is recommended to use application-specific passwords, see http://support.google.com/mail/bin/answer.py?hl=en&answer=1173270 for details.

#!/usr/bin/python
 
import smtplib # part of standard installation
import argparse # not part of standard installation
 
parser = argparse.ArgumentParser()
parser.add_argument("path", help="path to the repository on the server")
parser.add_argument("version", help="version of the commit")
 
args = parser.parse_args()
print args.path
print args.version
 
server = 'smtp.gmail.com'
port = 587
 
sender = '<sender mail address>'
recipient = '<receiver mail address>'
password = "<password>"
subject = 'SVN Commit'
body = 'SVN Commit: '
 
body = body +  args.path + ' ' +  args.version
 
headers = ["From: " + sender,
           "Subject: " + subject,
           "To: " + recipient,
           "MIME-Version: 1.0",
           "Content-Type: text/html"]
headers = "\r\n".join(headers)
 
session = smtplib.SMTP(server, port)
 
session.ehlo()
session.starttls()
session.ehlo
session.login(sender, password)
 
session.sendmail(sender, recipient, headers + "\r\n\r\n" + body)
session.quit()

Deutsche Zusammenfassung: Subversion stellt gewisse Einsprungspunkte bereit, zu denen man eigene Skripte ausführen kann. Mit Python lässt sich recht einfach ein Skript schreiben, das einen Nutzer über z.B. ein Commit informiert.

Uwe

Uwe Ziegenhagen likes LaTeX and Python, sometimes even combined. Do you like my content and would like to thank me for it? Consider making a small donation to my local fablab, the Dingfabrik Köln. Details on how to donate can be found here Spenden für die Dingfabrik.

More Posts - Website

Creating pgfgantt Calendars for 2013 with Excel

The pgfgantt package is a great tool to create Gantt charts, that are quite useful in the management of projects since one can visualize task dependencies with their help.

To get to know this package a little better I have –with the help of stackexchange— created a calendar for 2013 (PDF), showing the 365 days with SAT & SUN highlighted.

To add an entry to the calendar however I need to calculate the number of the day for the start and end date — a task Excel is quite good at. I played a little and finally came up with an Excel file that allows me to enter the start and end dates plus the name of the Gantt-bar and puts then together the string for the Gantt-bar.

The first columns are pretty self-explaining, the „description“ column is not exported to the LaTeX code. All the magic happens in the final column, let’s look at some example (Excel file):


="\ganttbar" & WENN([@Color]<>"";"[bar/.style={fill=" & [@Color] &"}]";) &"{" &[Name] & "}{"& C3-41274&"}{"&D3-41274&"}" & WENN([@Name]=B4;"";"\\")

pgfgantt_calendar

It is basically just a concatenation of strings with some IF („WENN“ in German) and date calculation. The first WENN is used to determine if the color has been set. If it is set, some brackets need to be printed with the bar/fill stuff. The Name of the bar is printed, then I calculate the differences from the first date and the number 41274 (corresponds to Deember 31st in Excel number format) and the second date and the number 41274. Since I can have more than one bar in one line I check if the line below has the same name. If it has, no „\\“ shall be printed, if it is different I want to finish this line. I can then copy the generated code directly into my LaTeX file:

\documentclass{article}
\usepackage[paperwidth=160cm, paperheight=50cm,
            left=1cm,right=1cm,top=5cm,bottom=5cm]{geometry}
\usepackage[utf8]{inputenc}
\usepackage[T1]{fontenc}
\usepackage{pgfgantt}
\usetikzlibrary{calendar}
 
\protected\def\zzz#1{%
\pgfcalendarifdate{2012-12-31+#1}{weekend}% Test if it's a weekend
{\textcolor{red}{\pgfcalendarifdateday}}% Typeset with red color
{\pgfcalendarifdateday}% Or just the number
}
 
\begin{document}
 
\begin{ganttchart}[hgrid, vgrid, x unit=0.425cm]{365}
\gantttitle{Projektplan}{365} \\
\gantttitlelist[
title list options={var=\y, evaluate=\y as \x using {"\zzz{\y}"}}
]{1,...,365}{1} \\
\ganttbar[bar/.style={fill=yellow}]{public holiday}{8}{8}\\
\ganttbar{some conference}{65}{67}\\
\ganttbar[bar/.style={fill=blue}]{some date}{36}{49}
\ganttbar[bar/.style={fill=green}]{some date}{51}{55}\\
\end{ganttchart}
 
\end{document}

Deutsche Zusammenfassung: Die Erstellung von Einträgen für pgfgantt-basierte Kalender kann man deutlich vereinfachen, wenn man in einer Excel-Datei die notwendigen Informationen zusammenbaut.

Uwe

Uwe Ziegenhagen likes LaTeX and Python, sometimes even combined. Do you like my content and would like to thank me for it? Consider making a small donation to my local fablab, the Dingfabrik Köln. Details on how to donate can be found here Spenden für die Dingfabrik.

More Posts - Website

Accessing date, title, author in LaTeX documents

Per default there is no way to access the content of the \title, \author and \date variables from within the LaTeX document, since the \maketitle command clears their content. The following example illustrates this:

\documentclass{article}
 
\title{Some Title}
\author{Uwe Ziegenhagen}
 
\begin{document}
 
\makeatletter
Content: \@date, \@author, \@title
\makeatother
 
\maketitle
 
\makeatletter
Content: \@date, \@author, \@title
\makeatother
 
\end{document}

The solution is however pretty easy. One could define own commands which take the content of those variables or just use the titling package. It provides \thetitle, \theauthor and \thedate.

\documentclass{article}
\usepackage{titling}
\title{Some Title}
\author{Uwe Ziegenhagen}
\date{01.01.1901}
 
\begin{document}
 
\maketitle
 
\theauthor
 
\thetitle
 
\thedate
 
\end{document}

Deutsche Zusammenfassung: Nach dem Aufruf von \maketitle kann man nicht mehr auf die Inhalte von \date, \author und \title zugreifen. Das titling Paket von Peter Wilson und Will Robertson stellt entsprechende Befehle bereit, die dies ermöglichen.

Uwe

Uwe Ziegenhagen likes LaTeX and Python, sometimes even combined. Do you like my content and would like to thank me for it? Consider making a small donation to my local fablab, the Dingfabrik Köln. Details on how to donate can be found here Spenden für die Dingfabrik.

More Posts - Website

Artikel zum Raspberry Pi bei SPON

Spiegel online hat einen recht umfangreichen Artikel zum Raspberry Pi veröffentlicht: http://www.spiegel.de/netzwelt/web/raspberry-pi-die-besten-projekte-fuer-den-46-euro-pc-a-874993.html

Uwe

Uwe Ziegenhagen likes LaTeX and Python, sometimes even combined. Do you like my content and would like to thank me for it? Consider making a small donation to my local fablab, the Dingfabrik Köln. Details on how to donate can be found here Spenden für die Dingfabrik.

More Posts - Website

Mit Powershell das Active Directory abfragen

Die heutige Aufgabe in Sachen Powershell war, diverse Informationen zu ACLs (Access Controll Lists) aus dem AD auszulesen. Diverse Personen wie die Zertifizierer der Gruppe sind in Feldern wie „Mail“ und „Info“ abgelegt, diese sollen in eine Excel-Liste exportiert werden.

Die folgenden Artikel waren hilfreich, um den Code zusammenzubauen:

Nachtrag vom 09.01.2013: Der unten stehende Code hat nur 1000 Zeilen abgefragt, durch das Einfügen von $searcher.pagesize=1000 ist diese Grenze aufgehoben.

# Uwe Ziegenhagen, 21.12.2012
# Path for the CSV file to be written to
 
$outputpath = "d\groups.csv"
 
# some AD stuff
$root = [ADSI]''
# initialize the AD searcher
$searcher = new-object System.DirectoryServices.DirectorySearcher($root)
# which groups shall be returned
$searcher.filter = "(&(objectClass=group) (CN=some-group-name*))"
$searcher.pagesize=1000
 
# need to add the variables that shall appear in the result
$searcher.PropertiesToLoad.Add("cn");
 
$searcher.PropertiesToLoad.Add("description");
$searcher.PropertiesToLoad.Add("mail");
$searcher.PropertiesToLoad.Add("info");
 
# call the finder
$adfind = $searcher.findall()
 
# first line of the output file
"Group`tDescription`trole1`trole21`trole22`trole23"  | out-file $outputpath -Width 300
 
foreach ($i in $adfind ) {
   # get the properties from the search result
   $name = "" + $i.properties.item("cn")
   $description = "" + $i.properties.item("description")
   $role1 = "" + $i.properties.item("info")
 
   # some entries include garbage like 'contact:' instead of the pure name
   # to get rid of whitespace I then trim everything
   $role1= $role1.replace("contact:","").trim()
 
   $role2 = "" + $i.properties.item("mail")
   # there are up to 3 role2s, split this entry into different columns
   $role2 = $role2.replace(",","`t")
 
   # create line
   $line = $name + "`t" + $description + "`t" + $role1  + "`t" + $role2 
   # replace carriage-returns
   $line.replace("`n","");
   # write line to file
   $line | out-file -append $outputpath -Width 300
}

Uwe

Uwe Ziegenhagen likes LaTeX and Python, sometimes even combined. Do you like my content and would like to thank me for it? Consider making a small donation to my local fablab, the Dingfabrik Köln. Details on how to donate can be found here Spenden für die Dingfabrik.

More Posts - Website

Unterschiedliche Kopfzeilen in MS Word

Im Vergleich zu LaTeX ist Word natürlich Mist (obwohl es schon besser geworden ist), aber beruflich muss ich halt damit arbeiten. Hier ein Tipp, wie man unterschiedliche Kopfzeilen in einem Dokument nutzen kann: http://mstechnology.wordpress.com/2009/08/17/unterschiedliche-kopfzeilen-in-einem-dokument-mit-word-2007/.

Uwe

Uwe Ziegenhagen likes LaTeX and Python, sometimes even combined. Do you like my content and would like to thank me for it? Consider making a small donation to my local fablab, the Dingfabrik Köln. Details on how to donate can be found here Spenden für die Dingfabrik.

More Posts - Website

Kommentare in LaTeX ein- und ausblenden

Was ich in LaTeX vermisse, ist der Überarbeiten Modus von MS Office. Alle Hacks, die etwas ähnliches in LaTeX umsetzen, sind nicht so integriert wie in Word. Hier aber mal ein Beispiel, was mit LaTeX geht. Den Hinweis auf comment.sty habe ich auf der EuroTeX in Breskens von L. Arnold aufgeschnappt, zusätzlich bot http://www.astro.gla.ac.uk/~matthew/blog/?p=376 einen guten Überblick über das Paket.

Im folgenden Beispiel nutze ich das ifdraft Paket, um zu prüfen, ob „draft“ gesetzt wurde. Wenn dies der Fall ist, werden die drei Kommentar-Umgebungen eingeblendet, ansonsten nicht.

\documentclass[ngerman,draft]{article}
%\documentclass[ngerman]{article}
\usepackage{ifdraft}
\usepackage[utf8]{inputenc}
\usepackage[T1]{fontenc}
\usepackage{babel}
\usepackage{xcolor}
\usepackage{comment}
 
\ifdraft{%
\includecomment{versiona}%
\includecomment{versionb}%
\specialcomment{notea}{\begingroup\sffamily\color{red}}{\endgroup}
}{%
\excludecomment{versiona}%
\excludecomment{versionb}%
\excludecomment{notea}%
}
 
\begin{document}
 
Hallo Text. Durch Setzen der Klassenoption \texttt{draft} werden alle Kommentare eingeblendet.
 
 
\begin{versiona}
Hallo, ich bin der Text zu Version A.
\end{versiona}
 
 
\begin{versionb}
Hallo, ich bin der Text zu Version B.
\end{versionb}
 
\begin{notea}
Ich bin eine Note A.
\end{notea}
 
\end{document}

Ich denke, hieraus lassen sich noch einige schöne Anwendungen bauen.

Uwe

Uwe Ziegenhagen likes LaTeX and Python, sometimes even combined. Do you like my content and would like to thank me for it? Consider making a small donation to my local fablab, the Dingfabrik Köln. Details on how to donate can be found here Spenden für die Dingfabrik.

More Posts - Website

Namen zerlegen mit Excel

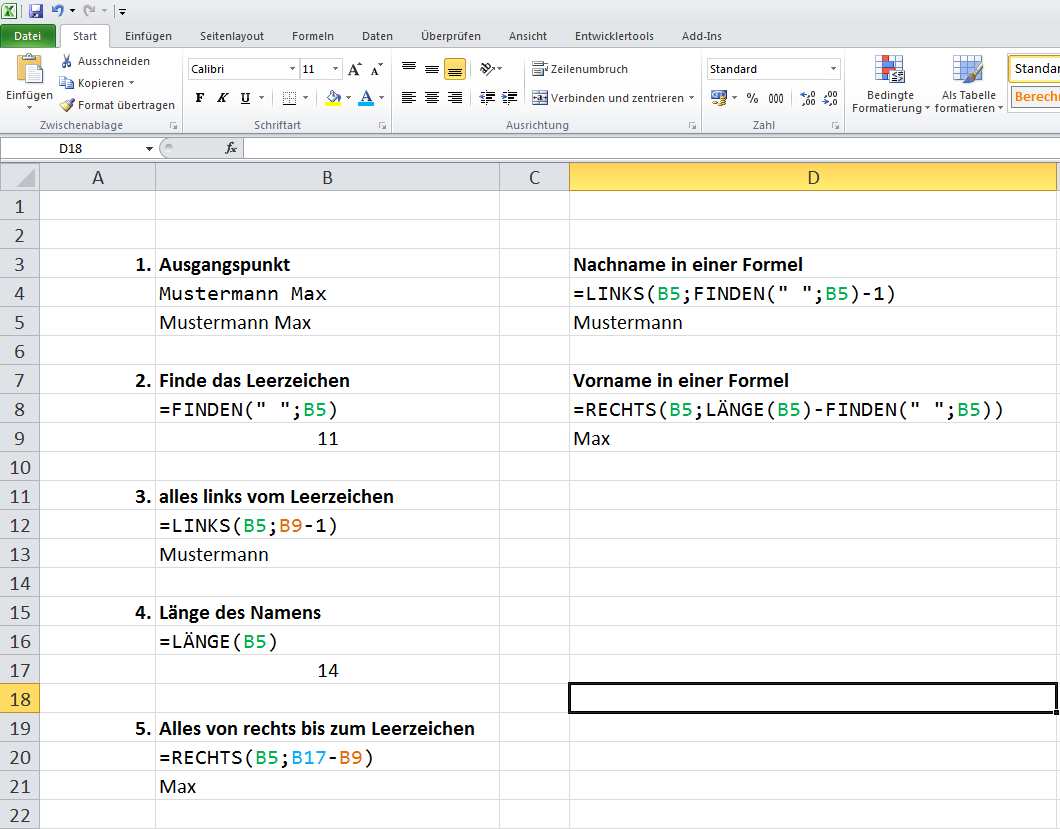
Nachdem mich am Freitag mal wieder die Frage erreichte, wie man mit Excel Namen der Form „Nachname Vorname“ in Vor- und Nachnamen zerlegen kann, hier ein kleines Tutorial.

MustermannMax.xlsx

Uwe

Uwe Ziegenhagen likes LaTeX and Python, sometimes even combined. Do you like my content and would like to thank me for it? Consider making a small donation to my local fablab, the Dingfabrik Köln. Details on how to donate can be found here Spenden für die Dingfabrik.

More Posts - Website

PDF Kommentare mit LaTeX setzen

Hier ein kurzes Beispiel, wie man mit LaTeX Kommentare im PDF setzt.

PDF

\documentclass{scrartcl}
\usepackage{pdfcomment}
\begin{document}
 
Ich bin ein Beispiel für einen Kommentar im PDF\pdfsquarecomment{Und ich bin der Kommentar!}
 
\end{document}

Uwe

Uwe Ziegenhagen likes LaTeX and Python, sometimes even combined. Do you like my content and would like to thank me for it? Consider making a small donation to my local fablab, the Dingfabrik Köln. Details on how to donate can be found here Spenden für die Dingfabrik.

More Posts - Website

Geometrie-Änderungen im Dokument mit geometry

Hier ein kurzes Beispiel, wie man mit dem geometry Paket das Layout im Dokument ändern kann.

PDF

\documentclass[12pt,ngerman]{scrartcl}
\usepackage{babel}
\usepackage[utf8]{inputenc}
\usepackage[T1]{fontenc}
\usepackage{blindtext}
 
\usepackage[a4paper]{geometry}
 
\begin{document}
 
\savegeometry{mysize}
 
\blindtext[10]
 
\newgeometry{left=1cm,top=1cm,right=1cm,bottom=1cm} 
 
\blindtext[10]
 
\restoregeometry{mysize}
 
\blindtext[10]
 
\end{document}

Für mehr Anpassungen siehe http://stackoverflow.com/questions/2812892/change-paper-size-in-the-middle-of-a-latex-document

Uwe

Uwe Ziegenhagen likes LaTeX and Python, sometimes even combined. Do you like my content and would like to thank me for it? Consider making a small donation to my local fablab, the Dingfabrik Köln. Details on how to donate can be found here Spenden für die Dingfabrik.

More Posts - Website