Archive for the ‘Python / SciPy / pandas’ Category.

Buchungen auswerten mit Python Pandas

Ich bin ehrenamtlich Schatzmeister der Dingfabrik Köln e.V., als solcher muss ich auch schauen, welches Mitglied denn die Beiträge bezahlt hat. Mit Hilfe von Pandas lassen sich die Buchungsdaten sehr elegant aufbereiten.

Ausgangspunkt sind die folgenden Excel-Dateien

Mitglieder.xlsx

Enthält die Mitgliedsnummer, den Namen sowie die Mitgliedsart (F für Fördermitglied, O für Ordentlich, E für Ehemalig, etc.)

Klasse Name Mitgliedsart
1 Max Mustermann O

Buchungen.xlsx

Die Buchungen wurden aus Quicken 2015 nach Excel exportiert, die Datei muss leider noch manuell bearbeitet werden, da der Excel-Export von Quicken nicht sonderlich schön ist. Die relevante Kategorie ist in diesem Beispiel „Mitgliedsbeitrag“, Klasse enthält die zugewiesene Mitgliedsnummer.

Buchungstag Konto Vorgang Empfänger Verwendungszweck Kategorie Klasse Betrag
04.01.2016 Firmengirokonto Köln 3763   Buchungstext bla, bla Mitgliedsbeitrag 1 23,00

Diese beiden Dateien können wir jetzt mit Pandas verarbeiten.

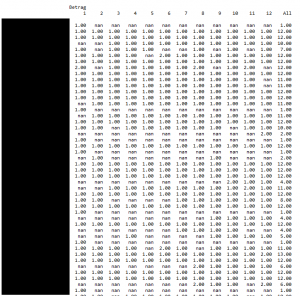
import pandas as pd
import numpy as np
import time as t
 
# Anpassungen an der Pandas-Ausgabe
pd.set_option('display.float_format', lambda x: '%.2f' % x)
# http://stackoverflow.com/questions/11707586/python-pandas-widen-output-display
pd.set_option('display.height', 1000)
pd.set_option('display.max_rows', 500)
pd.set_option('display.max_columns', 500)
pd.set_option('display.width', 1000)
 
# lies die Stammdaten aus Excel
mitglieder = pd.read_excel('Mitglieder.xlsx', 'Tabelle1')
# konvertier die Mitgliedsnummer in einen String
mitglieder['Klasse'] = mitglieder['Klasse'].apply(int).apply(str)
# Ehemalige Mitglieder interessieren nicht
mitglieder = mitglieder[mitglieder.Mitgliedsart.str.contains('A|F|O')]
 
# lies die Buchungen ein
buchungen = pd.read_excel('Buchungen.xlsx', 'Sheet')
# entferne alle Zeilen, die keinen 'Mitgliedbeitrag' enthalten
buchungen = buchungen[buchungen.Kategorie.str.contains('Mitgliedsbeitrag')]
 
# entferne Zeilen ohne Betrag oder Klasse
buchungen = buchungen[np.isfinite(buchungen['Betrag'])]
buchungen = buchungen[np.isfinite(buchungen['Klasse'])]
 
# Konvertiere den Buchungstag in ein Pandas-Datum
buchungen['Buchungstag'] = pd.to_datetime(buchungen['Buchungstag'],dayfirst=True,format='%d.%m.%Y') 
 
# Füge neue Spalten für Quartal und Monat hinzu
buchungen['Quartal'] = buchungen['Buchungstag'].dt.quarter
buchungen['Monat'] = buchungen['Buchungstag'].dt.month
 
# Wandle 'Klasse' von Float => Integer => String 
buchungen['Klasse'] = buchungen['Klasse'].apply(int).apply(str) 
 
# Führe einen right join durch, wir wollen auch die Datensätze von Mitgliedern haben, die noch aktiv sind, aber noch nichts bezahlt haben
buchungen = pd.merge(buchungen,mitglieder, how='right', on=['Klasse', 'Klasse'])
 
# Durch den right Join haben wir jetzt einige NaN (Not a Number) Zellen, die wir durch 0.0 ersetzen
# Dadurch erzeugen wir Dummy Datensätze, die aber nicht stören
buchungen['Betrag'].fillna(value=0,inplace=True)
buchungen['Buchungstag'].fillna(value=pd.Timestamp('20160101'),inplace=True)
# Einen Eintrag für die Monatsspalte nehmen wir auch vor, darüber wird pivotisiert
buchungen['Monat'] = buchungen['Buchungstag'].dt.month
 
# Erstellung der Pivot-Table
pivotTable = pd.pivot_table(buchungen,dropna=False,margins=True,index=['Name'],values=['Betrag'],columns=['Monat'],aggfunc=np.sum)
 
print(pivotTable)
 
# Optional: Rausschreiben der Tabelle nach Excel
#pivotTable.to_excel('pivotisiert.xlsx')

Das Ergebnis, hier anonymisiert und bei Betrag nur jeweils 1.0 eingetragen, sieht dann so aus:

pivot

Uwe

Uwe Ziegenhagen likes LaTeX and Python, sometimes even combined. Do you like my content and would like to thank me for it? Consider making a small donation to my local fablab, the Dingfabrik Köln. Details on how to donate can be found here Spenden für die Dingfabrik.

More Posts - Website

Excel und Python Win32COM

Hier ein kleines Beispiel, wie man mittels COM eine Excel-Mappe aus Python heraus befüllt und die Excel-Instanz beendet.

from win32com import client
 
# http://stackoverflow.com/questions/10221150/cant-close-excel-completely-using-win32com-on-python
def close_excel_by_force(excel):
    import win32process
    import win32gui
    import win32api
    import win32con
    import time
 
    # Get the window's process id's
    hwnd = excel.Hwnd
    t, p = win32process.GetWindowThreadProcessId(hwnd)
    # Ask window nicely to close
    win32gui.PostMessage(hwnd, win32con.WM_CLOSE, 0, 0)
    # Allow some time for app to close
    time.sleep(10)
    # If the application didn't close, force close
    try:
        handle = win32api.OpenProcess(win32con.PROCESS_TERMINATE, 0, p)
        if handle:
            win32api.TerminateProcess(handle, 0)
            win32api.CloseHandle(handle)
    except:
        pass
 
# Öffne Referenz zu Excel
excel = client.Dispatch("Excel.Application")
 
# Wir wollen sehen, was geschieht
excel.Visible= True
 
# Öffne eine bestehende Arbeitsmappe (im selben Verzeichnis)
wb = excel.Workbooks.Open('C:/Users/john/doe/win32test.xlsx')
 
# Wähle das erste Arbeitsblatt aus
ws = wb.Worksheets(1)
 
# Wähle alle Zellen aus
excel.Cells.Select()
# Entferne den Zellschutz
excel.Selection.Locked = False
# Wähle die Spalten B bis E aus
excel.Range("B:E").Select()
# setze den Zellschutz
excel.Selection.Locked = True
 
# Schütze das Sheet mit einem Passwort
ws.Protect("password", True, True)
 
# Speichere ab
wb.Save()
 
# Schließe die Mappe
wb.Close()
 
# Close Excel
excel.Quit()
wb = None
wbs = None
 
close_excel_by_force(excel)

Uwe

Uwe Ziegenhagen likes LaTeX and Python, sometimes even combined. Do you like my content and would like to thank me for it? Consider making a small donation to my local fablab, the Dingfabrik Köln. Details on how to donate can be found here Spenden für die Dingfabrik.

More Posts - Website

Building a Raspberry Pi 2cluster

This entry is part 1 of 5 in the series Raspberry Cluster

Big Data, Hadoop, NumPy, R cluster computing etc. are pretty hot topics. To get my hands on them and get a deeper understanding I have decided to build my own cluster out of small Raspberry Pi 2 computers. I am not the first one to come up with this idea, you can find a few nice examples online.

I have decided to use five Raspberry Pi 2 and one Banana Pi in this cluster. The Banana Pi has the advantage of being equipped with a Serial ATA port, my plan is to use it to store the data the Raspberries are working on.

The general setup is the following:

  1. 5 x Raspberry Pi 2 from Pollin for 37.95 Euro each
  2. A TP-Link 8-Port Gigabit Switch for 20.99 Euro
  3. a 6-Port RAVpower USB power source (3 x 1.0 Amp, 3 x 2.4 Amp) for 17.99 Euro
  4. a couple of five micro USB cables for 12.99 Euro
  5. Identical 16 GB micro-SD cards from Sandisk, Class 10 for 10.99 each
  6. the Banana Pi (I got mine from notebooksbilliger.de for 33.89 Euro)
  7. a SATA Power/Data cable to connect a 2.5″ harddisk to the Banana Pi

So altogether I spent around 320 for the electronic parts, some other parts (like SD card and USB cable for the Banana Pi) I had in my stash.

In the next article of this series I’ll describe the case I am currently building out of Lego Technics parts…

Uwe

Uwe Ziegenhagen likes LaTeX and Python, sometimes even combined. Do you like my content and would like to thank me for it? Consider making a small donation to my local fablab, the Dingfabrik Köln. Details on how to donate can be found here Spenden für die Dingfabrik.

More Posts - Website

Ostern mit Python bestimmen

Die Oster-Formel der Wikipedia kann man recht einfach in einem Python-Algorithmus nutzen:

import datetime
 
def calcEaster(jahr):
	a = jahr % 19 
	b = jahr % 4  
	c = jahr % 7  
	k = jahr / 100
 
	p = (8 * k  + 13) / 25
	q = k / 4
	M = (15 + k - p - q) % 30
	d = (19 * a + M) % 30
	N = (4 + k - q) % 7
	e = (2 * b + 4 * c + 6 * d + N) % 7
 
	Ostermontag = (22 + d + e) - 1
 
	start = datetime.datetime.strptime("01.03." + str(jahr), "%d.%m.%Y")
	easter = start + datetime.timedelta(days=round(Ostermontag))
	return easter.strftime('%d.%m.%Y')
 
for i in range(2014,2050):
	print(calcEaster(i))

Ergänzung: Das Osterparadoxon ist nicht berücksichtigt!

Uwe

Uwe Ziegenhagen likes LaTeX and Python, sometimes even combined. Do you like my content and would like to thank me for it? Consider making a small donation to my local fablab, the Dingfabrik Köln. Details on how to donate can be found here Spenden für die Dingfabrik.

More Posts - Website

Checking TeX files for cite-errors

Today I had to TeX a longer file with numerous \cite[somestuff]{citekey} sequences, of which some had hard-to-spot errors (some ‚]‘ were missing). The following Python script checks if each \cite command has matching '[]' and '{}' sequences. I’ll probably extend this script to accept simple \cite{citekey} sequences that have no optional parameter.

#!/usr/bin/python
import re
 
with open('filetocheck.tex') as f:
	content = f.readlines()
 
index = 0
 
for a in content:
	index = index + 1
	if "cite"  in a: # check only lines that contain 'cite'
		matches = re.search(r'(.*)\[(.*)\]\{(.*)\}',a) # search for <sometext>[<sometext>]{<sometext>}
		if not matches:
			print (">>> Fail in row" , str(index), a)

Uwe

Uwe Ziegenhagen likes LaTeX and Python, sometimes even combined. Do you like my content and would like to thank me for it? Consider making a small donation to my local fablab, the Dingfabrik Köln. Details on how to donate can be found here Spenden für die Dingfabrik.

More Posts - Website

Creating MD5 files with Python

This entry is part 4 of 4 in the series MD 5 Calculation

Here’s the probably last part of this series, the missing piece showing the calculation of MD5 files with Python:

# http://www.pythoncentral.io/hashing-files-with-python/
import hashlib
import os
import codecs
 
hasher = hashlib.md5()
 
def calcHash(filename):
	print("Filename:   " + filename)
	with open(filename, 'rb') as afile:
		buf = afile.read()
		hasher.update(buf)
		print("Calculated: " + hasher.hexdigest())
		md5file = (os.path.splitext(filename)[0]) + ".md5"
		writeMD5 = codecs.open(md5file, "wb", "utf-8-sig")
		writeMD5.write(hasher.hexdigest())
 
calcHash("e:/arara.log")

Uwe

Uwe Ziegenhagen likes LaTeX and Python, sometimes even combined. Do you like my content and would like to thank me for it? Consider making a small donation to my local fablab, the Dingfabrik Köln. Details on how to donate can be found here Spenden für die Dingfabrik.

More Posts - Website

Using Python to compute a MD5 Hash

This entry is part 3 of 4 in the series MD 5 Calculation

Here some Python code to calculate the MD5 hash for a given file:

# from http://www.pythoncentral.io/hashing-files-with-python/
import hashlib
 
hasher = hashlib.md5()
with open('e:/Mappe1.xlsx', 'rb') as afile:
    buf = afile.read()
    hasher.update(buf)
print(hasher.hexdigest())

Here the final script that provides the same functionality as the Powershell script I posted earlier today:

# http://www.pythoncentral.io/hashing-files-with-python/
import hashlib
import os
import codecs
 
hasher = hashlib.md5()
 
def calcHash(filename):
	print("Filename:   " + filename)
	with open(filename, 'rb') as afile:
		buf = afile.read()
		hasher.update(buf)
		print("Calculated: " + hasher.hexdigest())
		md5file = (os.path.splitext(filename)[0]) + ".md5"
		givenMD5 = codecs.open(md5file, "r", "utf-8-sig")
		print("Provided:   " + str(givenMD5.read()).lower())
 
calcHash("e:/Mappe1.xlsx")

Uwe

Uwe Ziegenhagen likes LaTeX and Python, sometimes even combined. Do you like my content and would like to thank me for it? Consider making a small donation to my local fablab, the Dingfabrik Köln. Details on how to donate can be found here Spenden für die Dingfabrik.

More Posts - Website

Accessing FTP servers with Python

Here’s a short code sample how to list a remote directory via FTP.

from ftplib import FTP
 
ftp = FTP('server')
ftp.connect()
ftp.login('user','password')                    
ftp.cwd('folder')              
ftp.dir()
ftp.quit()

Hier noch der passende Code für den Upload von Dateien:

import ftplib
import os
 
def upload(ftp, file):
    ext = os.path.splitext(file)[1]
    print("Putting ", file)
    if ext in (".txt", ".htm", ".html" , ".tex"):
        ftp.storlines('STOR ' + file, open(file,'rb'))
    else:
        ftp.storbinary('STOR ' + file, open(file,'rb'))
 
ftp = ftplib.FTP("remoteserver")
ftp.login("user", "password")
 
upload(ftp, "index.html")

Uwe

Uwe Ziegenhagen likes LaTeX and Python, sometimes even combined. Do you like my content and would like to thank me for it? Consider making a small donation to my local fablab, the Dingfabrik Köln. Details on how to donate can be found here Spenden für die Dingfabrik.

More Posts - Website

Generating math exercises for kids

Here’s a simple Python script which generates math exercises for kids. It uses the Century Schoolbook font which is said to be well readable and LaTeX’s longtable. I just ran some tests, generating 24’000 lines on 2000 pages was no deal at all.

#!/usr/bin/python
# coding: utf-8
import random
import os
 
min = 1 # number to start with
max = 10 # maximum number
count = 24 # 12 fit on one page
 
with open('Aufgaben.tex', 'w') as texfile:
	texfile.write("\\documentclass[15pt,ngerman]{scrartcl}\n")
	texfile.write("\\usepackage[utf8]{inputenc}\n")
	texfile.write("\\usepackage{tgschola,longtable}\n")
	texfile.write("\\usepackage[T1]{fontenc}\n")
	texfile.write("\\setlength{\\parindent}{0pt}\n")
	texfile.write("\\pagestyle{empty}\n")
	texfile.write("\\renewcommand*{\\arraystretch}{1.5}\n")
	texfile.write("\\begin{document}\n")
	texfile.write("\\huge\n")
	texfile.write("\\begin{longtable}{cccp{8cm}c}")
 
	for i in range(count):
		a = random.randint(min, max)
		b = random.randint(min, max)
 
		result = a + b;
 
		texfile.write('%s &+ &%s &= &%s \\\\ \\hline\n'%(str(a),str(b),str(result)))
 
	texfile.write("\\end{longtable}\n")
	texfile.write("\\end{document}\n")
 
os.system("pdflatex Aufgaben.tex")
os.startfile("Aufgaben.pdf") # this line may not work under Linux

With little modification one can also generate substraction exercises:

#!/usr/bin/python
# coding: utf-8
import random
 
min = 1
max = 12
count = 24
 
import os # for sys calls
 
with open('Aufgaben.tex', 'w') as texfile:
	texfile.write("\\documentclass[15pt,ngerman]{scrartcl}\n")
	texfile.write("\\usepackage[utf8]{inputenc}\n")
	texfile.write("\\usepackage{tgschola,nicefrac,longtable}\n")
	texfile.write("\\usepackage[T1]{fontenc}\n")
	texfile.write("\\setlength{\\parindent}{0pt}\n")
	texfile.write("\\pagestyle{empty}\n")
	texfile.write("\\renewcommand*{\\arraystretch}{1.5}\n")
	texfile.write("\\begin{document}\n")
	texfile.write("\\huge\n")
	texfile.write("\\begin{longtable}{cccp{8cm}c}")
 
	for i in range(count):
		b = random.randint(min, max)
		a =  b + random.randint(1, 9)
 
		result = a - b;
 
		texfile.write('%s &- &%s &= &%s \\\\ \\hline\n'%(str(a),str(b),str(result)))
 
	texfile.write("\\end{longtable}\n")
	texfile.write("\\end{document}\n")
 
os.system("pdflatex Aufgaben.tex")
os.startfile("Aufgaben.pdf")

Uwe

Uwe Ziegenhagen likes LaTeX and Python, sometimes even combined. Do you like my content and would like to thank me for it? Consider making a small donation to my local fablab, the Dingfabrik Köln. Details on how to donate can be found here Spenden für die Dingfabrik.

More Posts - Website

Kalenderwochen erzeugen mit Python

Basierend auf einem Kommentar zu http://code.activestate.com/recipes/521915-start-date-and-end-date-of-given-week/ hier ein kurzer Code-Schnipsel, der die Anfangs- und Endtage aller Kalenderwochen in 2014 ausspuckt.

from datetime import date, timedelta
 
def get_week_days(year, week):
    d = date(year,1,1)
    if(d.weekday()>3):
        d = d+timedelta(7-d.weekday())
    else:
        d = d - timedelta(d.weekday())
    dlt = timedelta(days = (week-1)*7)
    return d + dlt,  d + dlt + timedelta(days=6)
 
for x in range(1, 54):
	a,b = get_week_days(2014,x);
	print ("\\subsection{" + a.strftime('%d.%m.%Y') + " -- " +  b.strftime('%d.%m.%Y') + "}\n\n\n");

Uwe

Uwe Ziegenhagen likes LaTeX and Python, sometimes even combined. Do you like my content and would like to thank me for it? Consider making a small donation to my local fablab, the Dingfabrik Köln. Details on how to donate can be found here Spenden für die Dingfabrik.

More Posts - Website