Archive for the ‘Programmierung’ Category.

Generating math exercises for kids

Here’s a simple Python script which generates math exercises for kids. It uses the Century Schoolbook font which is said to be well readable and LaTeX’s longtable. I just ran some tests, generating 24’000 lines on 2000 pages was no deal at all.

#!/usr/bin/python
# coding: utf-8
import random
import os
 
min = 1 # number to start with
max = 10 # maximum number
count = 24 # 12 fit on one page
 
with open('Aufgaben.tex', 'w') as texfile:
	texfile.write("\\documentclass[15pt,ngerman]{scrartcl}\n")
	texfile.write("\\usepackage[utf8]{inputenc}\n")
	texfile.write("\\usepackage{tgschola,longtable}\n")
	texfile.write("\\usepackage[T1]{fontenc}\n")
	texfile.write("\\setlength{\\parindent}{0pt}\n")
	texfile.write("\\pagestyle{empty}\n")
	texfile.write("\\renewcommand*{\\arraystretch}{1.5}\n")
	texfile.write("\\begin{document}\n")
	texfile.write("\\huge\n")
	texfile.write("\\begin{longtable}{cccp{8cm}c}")
 
	for i in range(count):
		a = random.randint(min, max)
		b = random.randint(min, max)
 
		result = a + b;
 
		texfile.write('%s &+ &%s &= &%s \\\\ \\hline\n'%(str(a),str(b),str(result)))
 
	texfile.write("\\end{longtable}\n")
	texfile.write("\\end{document}\n")
 
os.system("pdflatex Aufgaben.tex")
os.startfile("Aufgaben.pdf") # this line may not work under Linux

With little modification one can also generate substraction exercises:

#!/usr/bin/python
# coding: utf-8
import random
 
min = 1
max = 12
count = 24
 
import os # for sys calls
 
with open('Aufgaben.tex', 'w') as texfile:
	texfile.write("\\documentclass[15pt,ngerman]{scrartcl}\n")
	texfile.write("\\usepackage[utf8]{inputenc}\n")
	texfile.write("\\usepackage{tgschola,nicefrac,longtable}\n")
	texfile.write("\\usepackage[T1]{fontenc}\n")
	texfile.write("\\setlength{\\parindent}{0pt}\n")
	texfile.write("\\pagestyle{empty}\n")
	texfile.write("\\renewcommand*{\\arraystretch}{1.5}\n")
	texfile.write("\\begin{document}\n")
	texfile.write("\\huge\n")
	texfile.write("\\begin{longtable}{cccp{8cm}c}")
 
	for i in range(count):
		b = random.randint(min, max)
		a =  b + random.randint(1, 9)
 
		result = a - b;
 
		texfile.write('%s &- &%s &= &%s \\\\ \\hline\n'%(str(a),str(b),str(result)))
 
	texfile.write("\\end{longtable}\n")
	texfile.write("\\end{document}\n")
 
os.system("pdflatex Aufgaben.tex")
os.startfile("Aufgaben.pdf")

Uwe

Uwe Ziegenhagen likes LaTeX and Python, sometimes even combined. Do you like my content and would like to thank me for it? Consider making a small donation to my local fablab, the Dingfabrik Köln. Details on how to donate can be found here Spenden für die Dingfabrik.

More Posts - Website

Beispiel für eine MySQL Funktion

Ich bereite momentan die Spendenquittungen der Dingfabrik mit Python, Jinja2, MySQL und LaTeX auf. Um den SQL Code sauber zu halten, lagere ich einiges aus dem Python-Code in MySQL Funktionen aus.

Hier ein einfaches Beispiel, das basierend auf Parametern für Mitglieds-ID und Namenstyp entweder der Vornamen, Nachnamen oder kompletten Namen eines Mitglieds zurückgibt.

DROP FUNCTION IF EXISTS fs_getname;
DELIMITER $$
CREATE FUNCTION fs_getname(nummer INT, typ CHAR)
 RETURNS VARCHAR(100)
 NOT DETERMINISTIC
 BEGIN
	IF typ = 'c' THEN
		RETURN (SELECT TRIM(CONCAT(COALESCE(Vorname,"")," ",COALESCE(Name," "))) FROM Stammdaten WHERE  ID = nummer);
	ELSEIF typ = 'f' THEN
		RETURN (SELECT COALESCE(Vorname,"") FROM Stammdaten WHERE  ID = nummer);
	ELSEIF typ = 'l' THEN
		RETURN (SELECT COALESCE(Name,"") FROM Stammdaten WHERE  ID = nummer);		
	END IF;
END$$
DELIMITER ;

Uwe

Uwe Ziegenhagen likes LaTeX and Python, sometimes even combined. Do you like my content and would like to thank me for it? Consider making a small donation to my local fablab, the Dingfabrik Köln. Details on how to donate can be found here Spenden für die Dingfabrik.

More Posts - Website

Temperatur und Luftfeuchtigkeit messen mit dem Arduino Teil III – Auswertung

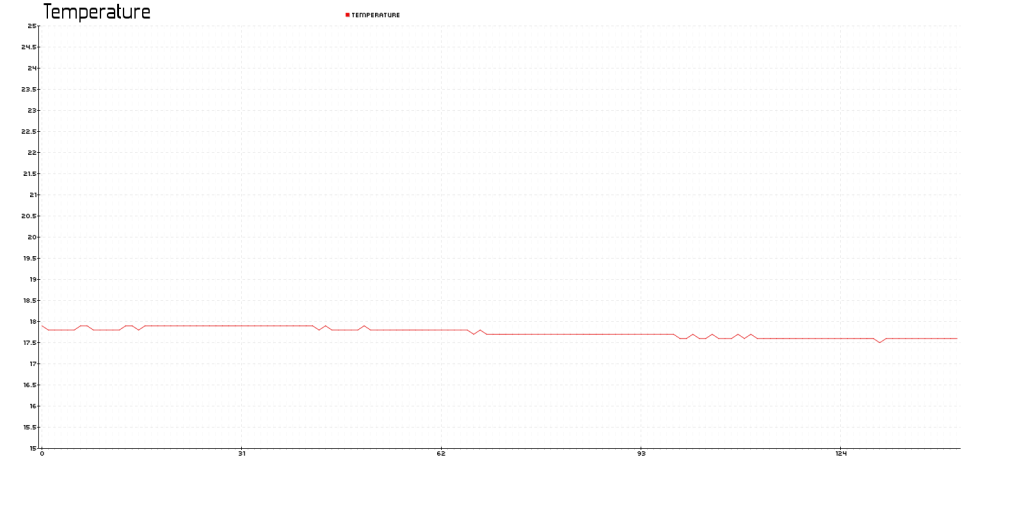
Nachdem jetzt die Daten erfolgreich in der Datenbank gespeichert werden können, wird es Zeit, die Daten zu visualisieren.

Dazu nutze ich pChart, eine für nicht-kommerzielle Zwecke freie PHP Bibliothek. Die Verbindung zur Datenbank war schnell erstellt, das folgende Beispiel ist nur eine Anpassung des Codes von http://wiki.pchart.net/doc.mysql.integration.html

Hinweis: Der Code ist noch nicht aufgeräumt, dies folgt in den nächsten Tagen.

<?php   
	/* pChart library inclusions */
	include("../pChart/class/pData.class.php");
	include("../pChart/class/pDraw.class.php");
	include("../pChart/class/pImage.class.php");
 
	/* Create and populate the pData object */
	$MyData = new pData();  
 
	/* Connect to the MySQL database */
	$db = mysql_connect("<server>", "<user>", "<password>");
	mysql_select_db("uwezie_db7",$db);
	/* Build the query that will returns the data to graph */
	$Requete = "SELECT temperature, humidity, timestamp FROM ( SELECT @row := @row +1 AS rownum, temperature, humidity, timestamp FROM ( SELECT @row :=0) r, data ) ranked WHERE rownum % 5 = 1 and timestamp >= now() - INTERVAL 24 hour";
	$Result  = mysql_query($Requete,$db);
$timestamp=""; $temperature=""; $humidity="";
 
if($Result == FALSE) {
    die(mysql_error()); // TODO: better error handling
}
 
while($row = mysql_fetch_array($Result))
 {
  /* Get the data from the query result */
  $timestamp   = $row["timestamp"];
  $temperature = $row["temperature"];
  $humidity    = $row["humidity"];
 
  /* Save the data in the pData array */
  //$myData->addPoints($timestamp,"Timestamp");
  $MyData->addPoints($temperature,"Temperature");
  //$myData->addPoints($humidity,"Humidity");
 }
 
 /* Create the pChart object */
 $myPicture = new pImage(1600,800,$MyData);
 /* Turn of Antialiasing */
 $myPicture->Antialias = FALSE;
 /* Add a border to the picture */
// $myPicture->drawRectangle(0,0,1599,799,array("R"=>0,"G"=>0,"B"=>0));
 /* Write the chart title */ 
 $myPicture->setFontProperties(array("FontName"=>"../pChart/fonts/Forgotte.ttf","FontSize"=>11));
 $myPicture->drawText(150,35,"Temperature",array("FontSize"=>30,"Align"=>TEXT_ALIGN_BOTTOMMIDDLE));
 /* Set the default font */
 $myPicture->setFontProperties(array("FontName"=>"../pChart/fonts/pf_arma_five.ttf","FontSize"=>8));
 /* Define the chart area */
 $myPicture->setGraphArea(60,40,1500,700);
 /* Draw the scale */
 $labelskip =  30; // 1000/24; // values = 1000, hours = 24
$AxisBoundaries = array(0=>array("Min"=>15,"Max"=>25));
$scaleSettings  = array("GridR"=>200,"GridG"=>200,"GridB"=>200,"DrawSubTicks"=>FALSE,"CycleBackground"=>FALSE,"Mode"=>SCALE_MODE_MANUAL, "ManualScale"=>$AxisBoundaries,"LabelSkip"=>$labelskip);
 
$serieSettings = array("R"=>229,"G"=>11,"B"=>11,"Alpha"=>100);
$MyData->setPalette("Temperature",$serieSettings);
 
 
 $myPicture->drawScale($scaleSettings);
 /* Turn on Antialiasing */
 $myPicture->Antialias = TRUE;
 /* Draw the line chart */
 $myPicture->drawLineChart();
 /* Write the chart legend */
 $myPicture->drawLegend(540,20,array("Style"=>LEGEND_NOBORDER,"Mode"=>LEGEND_HORIZONTAL));
 /* Render the picture (choose the best way) */
 $myPicture->autoOutput("drawobjects2.png");
?>
 
<img src="drawobjects2.png"/>

index5.php

Uwe

Uwe Ziegenhagen likes LaTeX and Python, sometimes even combined. Do you like my content and would like to thank me for it? Consider making a small donation to my local fablab, the Dingfabrik Köln. Details on how to donate can be found here Spenden für die Dingfabrik.

More Posts - Website

Temperatur und Luftfeuchtigkeit messen mit dem Arduino Teil I 1/2

Den ursprünglichen Sketch aus dem Artikel vom 24.12. habe ich so abgeändert, dass jetzt in der ersten Zeile die aktuelle Temperatur und Luftfeuchtigkeit gezeigt wird und in der zweiten Zeile die Min/Max Werte für die gemessene Temperatur.

// Beispielcode, um Temperatur/Luftfeuchtigkeit
// eines DHT22 auf einem Sparkfun SerialLCD auszugeben
 
#include "DHT.h"
#include <SoftwareSerial.h>
 
#define DHTPIN 2     // Pin für den DHT22
SoftwareSerial mySerial(4,3); // SoftwareSerial für das LCD
 
#define DHTTYPE DHT22   // DHT 22  (AM2302)
DHT dht(DHTPIN, DHTTYPE);
 
float maxtemp = 0.0;
float mintemp = 100.0;
 
 
void setup() {
  mySerial.begin(9600); // starte LCD Verbindung
  Serial.begin(9600); // starte zus. serielle Verbindung
  delay(500); // wait for display to boot up
 
  mySerial.write(254); // setze Cursor in die erste Zeile
  mySerial.write(128);
 
  mySerial.write("                "); // clear LCD
  mySerial.write("                ");
  delay(500);
  mySerial.write("  DHT22 Sensor");
 
  dht.begin();
}
 
char tempstring[10], humstring[10];
 
void loop() {
  float h = dht.readHumidity();
  float t = dht.readTemperature();
  delay(5000); // lese alle 5 Sekunden ein
 
  // check if returns are valid, if they are NaN (not a number) then something went wrong!
  if (isnan(t) || isnan(h)) {
    mySerial.write(254); // move cursor to beginning of first line
    mySerial.write(128);
    mySerial.println("DHT22 nicht gefunden");
  } else {
    mySerial.write(254); // move cursor to beginning of first line
    mySerial.write(128);
    mySerial.write("                "); // clear display
    mySerial.write("                ");
    mySerial.write(254); // move cursor to beginning of first line
    mySerial.write(128); 
    mySerial.print(t);
    mySerial.print(" *C ");      
    mySerial.print(h);
    mySerial.print("%");
    mySerial.write(254); // move cursor to beginning of 2nd line
    mySerial.write(192);
    if (t<mintemp){mintemp = t;};
    if (t>maxtemp){maxtemp = t;};
    mySerial.print(mintemp);
    mySerial.print(" ");
    mySerial.print(maxtemp);
    Serial.println(t);
 
  }
}

Uwe

Uwe Ziegenhagen likes LaTeX and Python, sometimes even combined. Do you like my content and would like to thank me for it? Consider making a small donation to my local fablab, the Dingfabrik Köln. Details on how to donate can be found here Spenden für die Dingfabrik.

More Posts - Website

Temperatur und Luftfeuchtigkeit messen mit dem Arduino Teil II – Speicherung der Messdaten

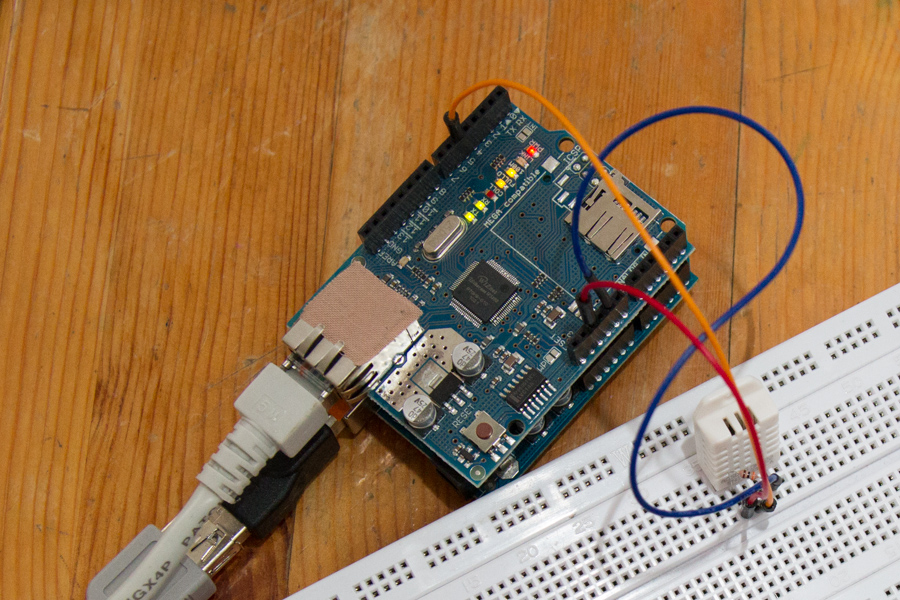
Nachdem das Messen und Anzeigen der DHT22 Daten recht einfach war, geht es in diesem Posting um die Speicherung der Daten. Ich habe es technisch so gelöst, dass der Arduino über das Ethernet-Shield eine URL aufruft und per Parameter die entsprechenden Variablen übergibt.

Hier der passende Arduino-Code. Der Ethernet Shield holt sich per DHCP eine IP-Adresse vom Server und ruft eine URL auf. Hinter der URL liegt ein PHP Skript, das die Daten mit SensorID und Zeitstempel in eine MySQL Datenbank schreibt. Ich nutze den Zeitstempel des Servers, dadurch spare ich es mir, eine RTC in die Schaltung einzubauen.

#include <Ethernet.h>
#include <SPI.h>
#include "DHT.h"
 
bool connected = false;
 
byte mac[] = { 0x90, 0xA2, 0xDA, 0x00, 0x22, 0x81};
byte serverIP[] = {123,123,123,123}; // Server IP address
 
EthernetClient client;
 
#define SENSORID 1
#define DHTPIN  5     // input pin 5
#define DHTTYPE DHT22   // DHT 22  (AM2302)
DHT dht(DHTPIN, DHTTYPE);
 
 
void setup()
{
  Ethernet.begin(mac); // no IP => DHCP
  Serial.begin(9600);
  Serial.println("setup done");
  dht.begin();
}
 
void loop()
{
  Serial.println("Entered loop");
if (!connected){ 
   Serial.println("Not connected");
  if (client.connect(serverIP,80)){
      connected = true;
      Serial.println("Connected to Server");
      Serial.println("Sending request to server");
      client.print("GET /somedir/someurl.php?s=");
      client.print(SENSORID);      
      client.print("&t=");
      client.print(dht.readTemperature());
      client.print("&h=");
      client.print(dht.readHumidity());
      client.println("HTTP/1.1");
      client.println("Host: www.uweziegenhagen.de");
      client.println("User-Agent: Arduino");
      client.println("Accept: text/html");
      client.println();
     } else {
        Serial.println("Cannot connect to server");
      }
    }   
  else {
    delay(500);
    while (client.connected() && client.available()) {
        char c = client.read();
        Serial.print(c);
      }
      Serial.println();
       client.stop(); 
       connected=false;
}
 
  Serial.println("Done now");
  delay(60000);
}

Hier noch das entsprechende PHP-Skript:

<?php
header('Content-type: text/plain');
echo "Sensor:" . $_GET['s'] . "Temperature= " . $_GET['t'] . " Humidity= " . $_GET['h'];
 
$link = mysql_connect("<server>", "<user>", "password") or die("Keine Verbindung möglich: " . mysql_error());
mysql_select_db("<database>") or die("Auswahl der Datenbank fehlgeschlagen");
$query = "INSERT INTO data values(" $_GET['s'] . "," . $_GET['t'] . "," . $_GET['h'] . ",NOW())";
$result = mysql_query($query) or die("Anfrage fehlgeschlagen: " . mysql_error());
 
mysql_close($link);
?>

Datenbank-Setup:

CREATE TABLE IF NOT EXISTS `data` (
  `sensor` tinyint(1) NOT NULL,
  `temperature` float NOT NULL,
  `humidity` float NOT NULL,
  `timestamp` datetime NOT NULL
) ENGINE=InnoDB DEFAULT CHARSET=latin1;

IMG_8334

Uwe

Uwe Ziegenhagen likes LaTeX and Python, sometimes even combined. Do you like my content and would like to thank me for it? Consider making a small donation to my local fablab, the Dingfabrik Köln. Details on how to donate can be found here Spenden für die Dingfabrik.

More Posts - Website

Kalenderwochen erzeugen mit Python

Basierend auf einem Kommentar zu http://code.activestate.com/recipes/521915-start-date-and-end-date-of-given-week/ hier ein kurzer Code-Schnipsel, der die Anfangs- und Endtage aller Kalenderwochen in 2014 ausspuckt.

from datetime import date, timedelta
 
def get_week_days(year, week):
    d = date(year,1,1)
    if(d.weekday()>3):
        d = d+timedelta(7-d.weekday())
    else:
        d = d - timedelta(d.weekday())
    dlt = timedelta(days = (week-1)*7)
    return d + dlt,  d + dlt + timedelta(days=6)
 
for x in range(1, 54):
	a,b = get_week_days(2014,x);
	print ("\\subsection{" + a.strftime('%d.%m.%Y') + " -- " +  b.strftime('%d.%m.%Y') + "}\n\n\n");

Uwe

Uwe Ziegenhagen likes LaTeX and Python, sometimes even combined. Do you like my content and would like to thank me for it? Consider making a small donation to my local fablab, the Dingfabrik Köln. Details on how to donate can be found here Spenden für die Dingfabrik.

More Posts - Website

Temperatur und Luftfeuchtigkeit messen mit dem Arduino I

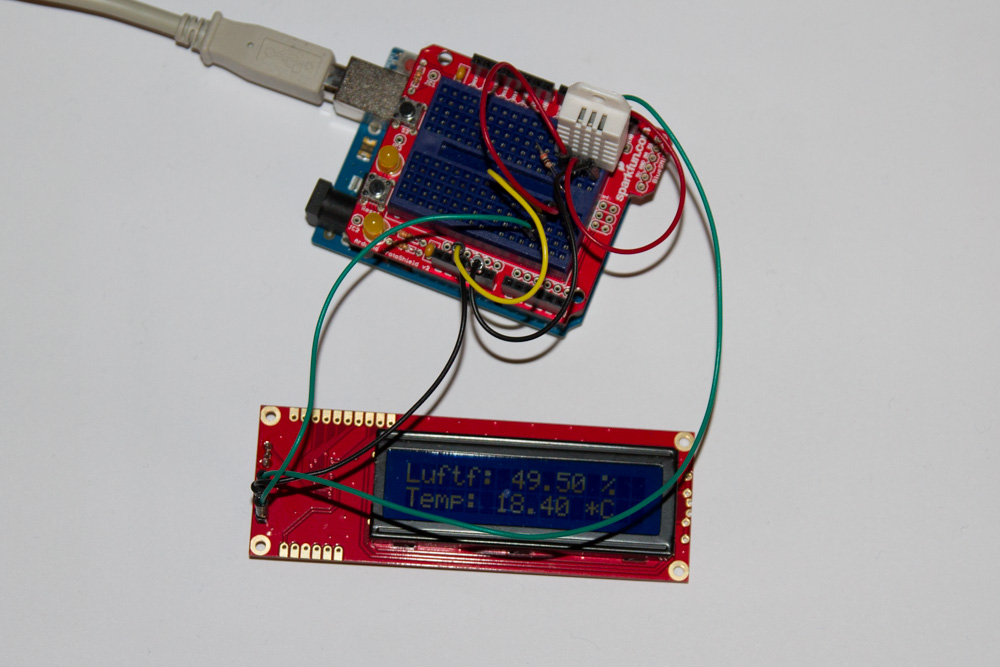
Vor ein paar Tagen habe ich mir zwei DHT22 Sensoren bei Watterott bestellt, die sowohl Temperatur als auch Luftfeuchtigkeit mit ausreichender Genauigkeit messen können.

Im ersten Sketch lese ich die Daten aus und gebe sie seriell sowohl auf einem angeschlossenen Sparkfun LCD als auch über die serielle Schnittstelle aus. Zum Auslesen des Sensors gibt es von Adafruit eine Bibliothek, die folgende Seite zeigt auch die Beschaltung: http://learn.adafruit.com/dht/connecting-to-a-dhtxx-sensor

IMG_8173

// Beispielcode, um Temperatur/Luftfeuchtigkeit
// eines DHT22 auf einem Sparkfun SerialLCD auszugeben
 
#include "DHT.h"
#include <SoftwareSerial.h>
 
#define DHTPIN 2     // Pin für den DHT22
SoftwareSerial mySerial(4,3); // SoftwareSerial für das LCD
 
#define DHTTYPE DHT22   // DHT 22  (AM2302)
DHT dht(DHTPIN, DHTTYPE);
 
void setup() {
  mySerial.begin(9600); // starte LCD Verbindung
  Serial.begin(9600); // starte zus. serielle Verbindung
  delay(500); // wait for display to boot up
 
  mySerial.write(254); // setze Cursor in die erste Zeile
  mySerial.write(128);
 
  mySerial.write("                "); // clear LCD
  mySerial.write("                ");
  delay(500);
  mySerial.write("  DHT22 Sensor");
 
  dht.begin();
}
 
char tempstring[10], humstring[10];
 
void loop() {
  float h = dht.readHumidity();
  float t = dht.readTemperature();
  delay(5000); // lese alle 5 Sekunden ein
 
  // check if returns are valid, if they are NaN (not a number) then something went wrong!
  if (isnan(t) || isnan(h)) {
    mySerial.write(254); // move cursor to beginning of first line
    mySerial.write(128);
    mySerial.println("DHT22 nicht gefunden");
  } else {
    mySerial.write(254); // move cursor to beginning of first line
    mySerial.write(128);
    mySerial.write("                "); // clear display
    mySerial.write("                ");
    mySerial.write(254); // move cursor to beginning of first line
    mySerial.write(128); 
    mySerial.print("Luftf: ");  
    mySerial.print(h);
    mySerial.print(" %");      
    Serial.println(h);
    mySerial.write(254); // move cursor to beginning of 2nd line
    mySerial.write(192);
    mySerial.print("Temp: ");  
    mySerial.print(t);
    mySerial.print(" *C");   
    Serial.println(t);
  }
}

Im nächsten Schritt werde ich die Daten per WLAN oder Ethernet in eine Datenbank schreiben.

Uwe

Uwe Ziegenhagen likes LaTeX and Python, sometimes even combined. Do you like my content and would like to thank me for it? Consider making a small donation to my local fablab, the Dingfabrik Köln. Details on how to donate can be found here Spenden für die Dingfabrik.

More Posts - Website

Pie-Charts mit R und ggplot2

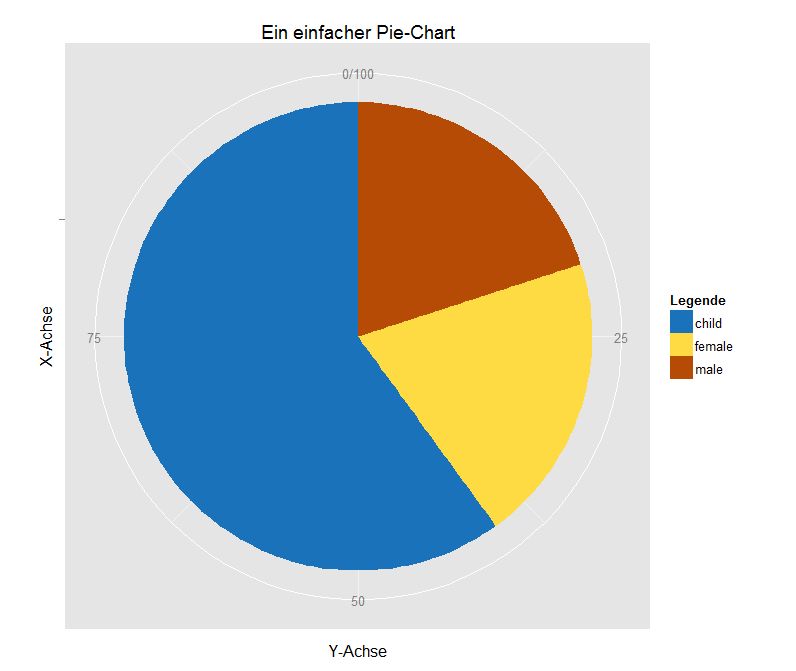
Here’s a simple example how to create a pie-chart (in PDF format) with R’s ggplot2 library.

pdf(file = "g:/test.pdf")
library("ggplot2")

df <- data.frame(
  Legende = c("male", "female", "child"),
  werte = c(20, 20,60)
)

blue <- rgb(26/255, 115/255, 186/255, 1) 
yellow <- rgb(255/255, 219/255, 67/255, 1) 
orange <- rgb(181/255, 75/255, 5/255, 1)

ggplot(df, aes(x = "", y = werte, fill = Legende)) +
	geom_bar(width = 1, stat = "identity") +
  	scale_fill_manual(values =  c(blue, yellow, orange)) +
  	coord_polar("y", start = 0) +
	labs(title = "Ein einfacher Pie-Chart")  +
	xlab("X-Achse") +
	ylab("Y-Achse") 
  
dev.off()

pie1

Uwe

Uwe Ziegenhagen likes LaTeX and Python, sometimes even combined. Do you like my content and would like to thank me for it? Consider making a small donation to my local fablab, the Dingfabrik Köln. Details on how to donate can be found here Spenden für die Dingfabrik.

More Posts - Website

My .emacs file (Org-Mode)

Here’s my .emacs file, from time to time this entry will be updated.

2016-08-17 added „distraction free“ part

2016-01-03 added key assignment for „duplicate line“ command

2015-12-30 added line for UTF-8 default encoding

2015-04-24 added German local for days and months

2014-12-22: latest update: F8 copies current entry to next week/day

2014-07-06: Added code to a) postpone one task and set it to todo for the next week using the key

2014-05-10: Added autoload buffer code

2014-03-30: Added colors for orgmode status

2013-11-17: moved loading the org-file behind setting the orgmode variables.

;; UTF-8 as default encoding
(set-language-environment "UTF-8")

;; Autoload buffers if they were changed outside Emacs
(global-auto-revert-mode t)  

;; ReStructured Text for Emacs
; http://docutils.sourceforge.net/docs/user/emacs.html#introduction
(require 'rst)

;; CCrypt Support
(setq load-path (cons "G:/Programme/emacs-24.3/myLisp/ccrypt" load-path))
(require 'ps-ccrypt "ps-ccrypt.el")


;; distraction-free
;;  https://nickhigham.wordpress.com/2016/01/14/distraction-free-editing-with-emacs/
(scroll-bar-mode 0)    ; Turn off scrollbars.
(tool-bar-mode 0)      ; Turn off toolbars.
(fringe-mode 0)        ; Turn off left and right fringe cols.
(menu-bar-mode 0)      ; Turn off menus.
;; bind fullscreen toggle to f9 key
(global-set-key (kbd "") 'toggle-frame-fullscreen)

;; http://emacs.stackexchange.com/questions/2999/how-to-maximize-my-emacs-frame-on-start-up
;; Start fullscreen (cross-platf)
(add-hook 'window-setup-hook 'toggle-frame-fullscreen t)
; emacs-doctor.com/emacs-strip-tease.html
;; Prevent the cursor from blinking
(blink-cursor-mode 0)
;; Don't use messages that you don't read
(setq initial-scratch-message "")
(setq inhibit-startup-message t)
;; Don't let Emacs hurt your ears
(setq visible-bell t)
(custom-set-faces
  '(default ((t (:background "black" :foreground "darkgrey"))))
  '(fringe ((t (:background "black")))))

;; Do not show welcome screen at startup
(setq inhibit-startup-message t)

;; just answer Emacs' question with 'y' or 'n' instead of 'yes'or 'no'
(defalias 'yes-or-no-p 'y-or-n-p)

;; Load org mode
;; update this line for your setup
(add-to-list 'load-path "G:/Programme/emacs-24.3/myLisp/org-8.2.10/lisp")

;; establish a globally accessible GTD TODO file
(setq org-default-notes-file (expand-file-name "~/Dropbox/central-notes.org"))

;; global key bindings for org mode
;; http://orgmode.org/manual/Activation.html#Activation
(global-set-key "\C-cl" 'org-store-link)
(global-set-key "\C-cc" 'org-capture)
(global-set-key "\C-ca" 'org-agenda)
(global-set-key "\C-cb" 'org-iswitchb)

;; Start Calendar View
(setq calendar-week-start-day 1)


;; http://blog.gmane.org/gmane.emacs.orgmode/day=20140530

(defun tj/copy-entry-to-next-day (); (state)
  (interactive)     ; add interactive to let emacs know to call it interactively
    "Copy entry at point to next parent and change its STATE."
    ; (interactive "sState: ")
    (setq state "POSTPONED")
    (save-excursion
      (save-restriction
        (widen)
        (unless (org-on-heading-p)
          (outline-previous-heading))
        (org-copy-subtree)
        (org-todo state)
        (org-up-heading-safe)
        (org-forward-heading-same-level 1)
        (forward-line)
        (org-yank))))


(global-set-key (kbd "") 'tj/copy-entry-to-next-day)


;; some org mode settings
;;;;;;;;;;;;;;;;;;;;;;;;;;;;;;;;

(setq org-todo-keyword-faces
      '(
        ("TODO" . (:foreground "red" :weight bold))
        ("PROGRESSING" . (:foreground "blue" :weight bold))
        ("FEEDBACK" . (:foreground "brown" :weight bold))
        ("VERIFY" . (:foreground "orange" :weight bold))
        ("POSTPONED" . (:foreground "LightSalmon4" :weight bold)) 
        ("DONE" . (:foreground "MediumSeaGreen" :weight bold)) 
	("DELEGATED" . (:foreground "ForestGreen" :weight bold))      
	("CANCELLED" . (:foreground "goldenrod" :weight bold))
        ))


;; no idea what the following does
(font-lock-add-keywords 'org-mode
  '(("^.*:write:.*$" . font-lock-keyword-face)))

(setq org-agenda-face-for-tagged-lines
   '(("write" . bold)))

;; Locales for Germany

;; see http://www.emacswiki.org/emacs/CalendarLocalization#toc8

(setq calendar-week-start-day 1
calendar-day-name-array ["Sonntag" "Montag" "Dienstag" "Mittwoch" "Donnerstag" "Freitag" "Samstag"]
calendar-month-name-array ["Januar" "Februar" "Maerz" "April" "Mai" "Juni" "Juli" "August" "September" "Oktober" "November" "Dezember"])

;; deprecated, use agenda mode instead
(setq org-tag-alist '(("Montag" . ?1)
                      ("Dienstag" . ?2)
                      ("Mittwoch" . ?3)
                      ("Donnerstag" . ?4)
                      ("Freitag" . ?5)
		      ("Sonnabend" . ?6)
		      ("Sonntag" . ?7)))

;; define some additional status 
;; http://orgmode.org/org.html#TODO-extensions
(setq org-todo-keywords
       '((sequence "TODO" "PROGRESSING" "FEEDBACK" "VERIFY" "POSTPONED" "|" "DELEGATED" "CANCELLED" "DONE")))

;; whenever some entry is set to done, log the timestamp
;; (setq org-log-done 'time)


;; some LaTeX-specific export settings
;; load the latex extensions
; (Require 'org-latex) # deprecated!
(require 'ox-html)
(require 'ox-latex)
(require 'ox-ascii)

; kick out all packages from org-mode's default list
; gives maximum of flexibility
;;(setq org-latex-packages-alist nil)
;;(setq org-latex-default-packages-alist nil)

;; now let's add a few custom class export templates
(add-to-list 'org-latex-classes
          '("koma-article"
	    "\\documentclass{scrartcl}
              \\usepackage[utf8]{inputenc}\n\\usepackage[T1]{fontenc}\n
\\usepackage{hyperref}\n"
             ("\\section{%s}" . "\\section*{%s}")
             ("\\subsection{%s}" . "\\subsection*{%s}")
             ("\\subsubsection{%s}" . "\\subsubsection*{%s}")
             ("\\paragraph{%s}" . "\\paragraph*{%s}")
             ("\\subparagraph{%s}" . "\\subparagraph*{%s}")))

(add-to-list 'org-latex-classes  ;; org-export-latex-classes is deprecated
'("scrlttr"
     "\\documentclass[11pt]{scrlttr2}\n
      \\usepackage[utf8]{inputenc}\n
      \\usepackage[T1]{fontenc}\n
      \\usepackage{xcolor}"
     
     ("\\section{%s}" . "\\section*{%s}")
     ("\\subsection{%s}" . "\\subsection*{%s}")
     ("\\subsubsection{%s}" . "\\subsubsection*{%s}")
     ("\\paragraph{%s}" . "\\paragraph*{%s}")
     ("\\subparagraph{%s}" . "\\subparagraph*{%s}")))


;; load a specific file at startup
(find-file "~/Dropbox/orgmode.org")

;; allow quick search links, here Google
(setq org-link-abbrev-alist 
      '(("google" . "https://www.google.com/search?q=%s")
        ("spiegel" . "http://www.spiegel.de/%s")
	("uwe" . "http://uweziegenhagen.de/?s=%s")))


;; local in a org mode document they can be set using
;; #+LINK: uwe http://uweziegenhagen.de/?s=%s
;; usage after definition: [[uwe:Arduino]]

;; enable python for in-buffer evaluation
;; http://orgmode.org/manual/Languages.html
(org-babel-do-load-languages
 'org-babel-load-languages
 '((python . t)))


;; let's define all python code as safe
(defun my-org-confirm-babel-evaluate (lang body)
(not (string= lang "python")))
(setq org-confirm-babel-evaluate nil)


;; duplicate current line, bind command to Ctrl-d
;; from http://stackoverflow.com/questions/88399/how-do-i-duplicate-a-whole-line-in-emacs
(defun duplicate-line (arg)
  "Duplicate current line, leaving point in lower line."
  (interactive "*p")
  ;; save the point for undo
  (setq buffer-undo-list (cons (point) buffer-undo-list))
  ;; local variables for start and end of line
  (let ((bol (save-excursion (beginning-of-line) (point))) eol)
    (save-excursion
      ;; don't use forward-line for this, because you would have
      ;; to check whether you are at the end of the buffer
      (end-of-line)
      (setq eol (point))
      ;; store the line and disable the recording of undo information
      (let ((line (buffer-substring bol eol))
            (buffer-undo-list t)
            (count arg))
        ;; insert the line arg times
        (while (> count 0)
          (newline)         ;; because there is no newline in 'line'
          (insert line)
          (setq count (1- count)))
        )
      ;; create the undo information
      (setq buffer-undo-list (cons (cons eol (point)) buffer-undo-list)))
    ) ; end-of-let
  ;; put the point in the lowest line and return
  (next-line arg))
(global-set-key "\C-d" 'duplicate-line)


;; load recentfile extension, 2nd menu item in 'file'
(require 'recentf)
(recentf-mode 1)
;; limit to 10 entries
(setq recentf-max-menu-items 10)
;; create global key to access the list
(global-set-key "\C-x\ \C-r" 'recentf-open-files)
(custom-set-variables
 ;; custom-set-variables was added by Custom.
 ;; If you edit it by hand, you could mess it up, so be careful.
 ;; Your init file should contain only one such instance.
 ;; If there is more than one, they won't work right.
 )
(custom-set-faces
 ;; custom-set-faces was added by Custom.
 ;; If you edit it by hand, you could mess it up, so be careful.
 ;; Your init file should contain only one such instance.
 ;; If there is more than one, they won't work right.
 '(default ((t (:family "Courier New" :foundry "outline" :slant normal :weight normal :height 158 :width normal)))))

Uwe

Uwe Ziegenhagen likes LaTeX and Python, sometimes even combined. Do you like my content and would like to thank me for it? Consider making a small donation to my local fablab, the Dingfabrik Köln. Details on how to donate can be found here Spenden für die Dingfabrik.

More Posts - Website

Dynamische Reports mit R

Vor kurzem hat mich jemand gefragt, wie man denn mit R Reports dynamisch gestalten könne. Ausgehend von Erfahrungen, die ich damals beim automatisierten Textsatz eines Konferenzprogramms sammeln konnte, war die Lösung nicht schwer.

Ausgangspunkt ist eine CSV Datei, die über das RSQLite Paket in eine in-memory Datenbank geladen wird. Auf des Basis dieser Datenbank werden dann ein paar SQL-Statements aufgebaut, die dann beliebig ausgewertet werden können.

# read excel table from csv to dataframe
df = read.table("g:/datasource.csv",sep=";",header=TRUE)
 
# set up plot window
par(mfrow = c(3,2))
 
# load SQlite library
library("RSQLite")
 
# create fresh database in memory
db <- dbConnect(SQLite(),dbname=".memory.")
 
# write dataframe to database
dbWriteTable(db, "kpi", df) 
 
# list all tables in db 
dbListTables(db)
 
# get a vector of all departments
departments = dbGetQuery(db, "Select distinct(department) from kpi")
 
 
for(i in 1:nrow(departments)){
	print(paste("Department",departments[i,1],sep=" "))
	statement = paste("Select distinct(manager) from kpi where department='",departments[i,1],"'",sep="")
	# print(statement)
	manager = dbGetQuery(db, statement)
 
	for(j in 1:nrow(manager)){
		print(paste("Manager",manager[j,1],sep=" "))
		statement = paste("Select distinct(employee) from kpi where department='",departments[i,1],"'"," and manager='",manager[j,1],"'",sep="")
		# print(statement)
		employee = dbGetQuery(db, statement)
 
		for(k in 1:nrow(employee)){
			print(paste("Employee",employee[k,1],sep=" "))
			statement = paste("Select kpi1,kpi2,kpi3 from kpi where department='",departments[i,1],"'"," and manager='",manager[j,1],"' and employee='",employee[k,1],"'",sep="")
			# print(statement)
			fulldata_employee = dbGetQuery(db, statement)
			# print(fulldata_employee)
			x <- c(1,2,3)
			plot(x,fulldata_employee,type="l",main=paste(departments[i,1],manager[j,1],employee[k,1],sep=" "))
		}
	}
}
 
dbDisconnect(db)

R

Uwe

Uwe Ziegenhagen likes LaTeX and Python, sometimes even combined. Do you like my content and would like to thank me for it? Consider making a small donation to my local fablab, the Dingfabrik Köln. Details on how to donate can be found here Spenden für die Dingfabrik.

More Posts - Website