Posts tagged ‘LaTeX’

Eigene Zähler in LaTeX & Word 2013 definieren

Was ich an LaTeX so schätze, sind die Funktionen zum „Programmieren“ eigener Strukturen. Möchte ich einen Befehl zum Erfassen von Business Requirements erstellen, nutze ich einfach eine Kombination aus \newcounter, \the“counter“ und \addtocounter.

\documentclass[12pt,ngerman]{scrartcl}
\usepackage[utf8]{inputenc}
\usepackage[T1]{fontenc}
\usepackage{babel}
 
\newcounter{br}
\addtocounter{br}{1}
\newcommand{\br}[1]{BR--\thebr\stepcounter{br}: #1}
 
\begin{document}
 \br{Button einbauen}
 \br{Zweiten Button einbauen}
\end{document}

In Word geht das auch, ist aber ein wenig komplizierter. Die folgende Beschreibung habe ich auf tips.net gefunden:

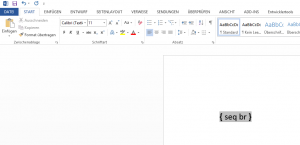
1. Schritt: Geh an die Stelle im Dokument, wo das Feld hin soll und drücke Strg-F9. Die erzeugt die Feldklammern.

01

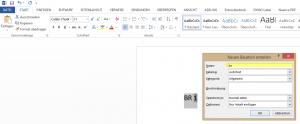
2. Schritt: Innerhalb der Feldklammern füge „seq br“ ein, „br“ steht dabei für den Namen des Zählers. Mit Alt-F9 kannst Du jetzt zwischen Code und Darstellung hin- und herwechseln.

02

03

3. Schritt: Markiere den gesamten Code-Bereich, der später eingefügt werden soll und drücke Alt-F3. Dies öffnet das Menü für die Codebausteine. Gib einen kurzen prägnanten Titel („br“) ein und speichere den Baustein ab.

04

4. Schritt: Wenn Du jetzt irgendwo im Dokument den Zähler benutzen willst, drücke „br“ und der Baustein wird eingefügt.

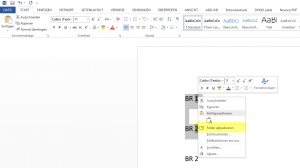
Solltest Du diese Bausteine auch mal zwischen bereits gesetzte Bausteine setzen, kann ein Refresh der Felder notwendig sein. Dann einfach Text markieren, rechte Maustaste und „Felder aktualisieren“.

05

Uwe

Uwe Ziegenhagen likes LaTeX and Python, sometimes even combined. Do you like my content and would like to thank me for it? Consider making a small donation to my local fablab, the Dingfabrik Köln. Details on how to donate can be found here Spenden für die Dingfabrik.

More Posts - Website

Creating Documents for Multiple Audiences (with the multiaudience package)

Boris Veytsman has recently published a new package to create output documents for multiple audiences in one single file.

The document creation process is divided into two steps: a) create the document and b) create the batch/bash file to automate the document creation.

Find below a sample document (save as ‚multdocument.tex‘) you can use as a starting point. As one can see, three audiences are defined here: „board“, „business“ and „tech“. The „shownto“ environment has one parameter, the comma-separated list of audiences, the content of the section shall be shown to. If the first item is a „-“ instead, the negates the meaning (so {-,board} means „show to every audience except the board). There are also commands for audience-specific footnotes or sections, check the manual for more information.

\begin{shownto}{board}
Some text for the board, for example an executive summary.
\end{shownto}

Remark 2015-08-17: With „tagging“ there is another package, that supports the creation of multiple editions in a single file.

\documentclass[12pt,english]{article}
\usepackage[utf8]{inputenc}
\usepackage[T1]{fontenc}
\usepackage{babel}
 
\usepackage{multiaudience}
 
\SetNewAudience{tech}
\SetNewAudience{business}
\SetNewAudience{board}
 
\begin{document}
 
This text is shown to everybody as it is outside any `multiaudience' environment
 
\begin{shownto}{board}
Some text for the board, for example an executive summary.
\end{shownto}
 
\begin{shownto}{tech,business}
Text for the tech department and the business users, for example a list of business requirements.
\end{shownto}
 
\begin{shownto}{-, board}
Text for every audience except the board.
\end{shownto}
 
Some text.\Footnote{board}{Some footnote just for the board}
 
 
\begin{Section}{board}[Short title]{Long Title of this Section}
 
Text in the section just for the board.
 
\end{Section}
 
 
\end{document}

After we have defined the document with the audiences we want to automate the PDF-creation process in which we tell LaTeX for which audience we want to create the document.

Since LaTeX can take definitions via LaTeX-commandline call, it’s quite easy to create a batch file with one line for each audience:

pdflatex -jobname file-board "\def\CurrentAudience{board}\input{multdocument}"
pdflatex -jobname file-tech "\def\CurrentAudience{tech}\input{multdocument}"
pdflatex -jobname file-business "\def\CurrentAudience{business}\input{multdocument}"

„-jobname“ defines the name of the PDF-file, the „\def{…}“ command sets the current audience. What you get when you run this batch is three different output files with just the information that shall be visible for each audience.

file-board

file-business

file-tech

Uwe

Uwe Ziegenhagen likes LaTeX and Python, sometimes even combined. Do you like my content and would like to thank me for it? Consider making a small donation to my local fablab, the Dingfabrik Köln. Details on how to donate can be found here Spenden für die Dingfabrik.

More Posts - Website
Umzug von Google Code nach Github

Da Google leider sein Google Code Angebot einstellt, habe ich meine öffentlichen LaTeX Repositories nach Github umziehen lassen. In Zukunft werde ich sicher mehr öffentliche Repositories nutzen, um Präsentationen und Dokumente zu veröffentlichen.

Template für Business Requirements Documents

Von code.google.com/p/latex-business-requirements-documents nach https://github.com/UweZiegenhagen/latex-business-requirements-documents

LaTeX Thesis Template

Von code.google.com/p/latex-thesis-template nach https://github.com/UweZiegenhagen/latex-thesis-template

Vorlage für Spendenquittungen

Von code.google.com/p/spendenquittungen-mit-latex nach https://github.com/UweZiegenhagen/spendenquittungen-mit-latex

Uwe

Uwe Ziegenhagen likes LaTeX and Python, sometimes even combined. Do you like my content and would like to thank me for it? Consider making a small donation to my local fablab, the Dingfabrik Köln. Details on how to donate can be found here Spenden für die Dingfabrik.

More Posts - Website

Stimmkarten mit LaTeX erstellen

Hier ein kleines Beispiel, wie man mit ticket.sty Stimmkarten für Vereinsversammlungen erstellen kann:

\documentclass[a4paper,12pt,ngerman]{scrartcl}
\usepackage[total={210mm,297mm},top=0mm,left=0mm, includefoot]{geometry}
\usepackage[badges]{ticket}
\usepackage{graphicx,palatino}
 
\usepackage{filecontents}
\begin{filecontents}{badges.tdf}
\unitlength=1mm
\hoffset=-5mm
\voffset=0mm
\ticketNumbers{1}{2}
\ticketSize{170}{120} % unitlength => mm
\ticketDistance{0}{0} % unitlength => mm
\end{filecontents}
 
\usepackage[utf8]{inputenc}
\usepackage[T1]{fontenc}
\usepackage{babel}
\usepackage{xcolor}
 
\renewcommand{\ticketdefault}{}%
\makeatletter
\@boxedtrue % Rahmen um Ticket
\@emptycrossmarkfalse % Falzmarken
\@cutmarktrue % Schnittmarken
\makeatother
 
\newcommand{\mylabel}[1]{
\ticket{%
\put(22,105){\Large \textit{Vereins-Mitgliedsversammlung September 2015}}
\put(30,55){\Huge\bfseries #1}
\put(67,15){\Large \textit{Stimmkarte}}
}}
 
\begin{document}
\mylabel{Max Mustermann}
\mylabel{Gabriele Musterfrau}
\end{document}

stimmkarten-01

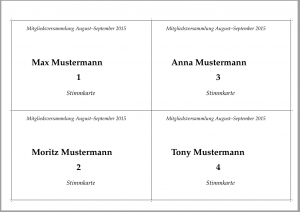
Durch einfaches Anpassen der badges.tdf (hier direkt im TeX-Dokument) kann man auch einfach 4-auf-1 Stimmkarten erstellen.

\documentclass[a4paper,12pt,ngerman]{scrartcl}
\usepackage[total={210mm,297mm},landscape,top=0mm,left=0mm, includefoot]{geometry}
\usepackage[badges]{ticket}
\usepackage{graphicx,palatino}
 
\usepackage{filecontents}
\begin{filecontents}{badges.tdf}
\unitlength=1mm
\hoffset=-15mm
\voffset=-10mm
\ticketNumbers{2}{2}
\ticketSize{140}{90} % unitlength => mm
\ticketDistance{0}{0} % unitlength => mm
\end{filecontents}
 
\usepackage[utf8]{inputenc}
\usepackage[T1]{fontenc}
\usepackage{babel}
 
\renewcommand{\ticketdefault}{}%
\makeatletter
\@boxedtrue % Rahmen um Ticket
\@emptycrossmarkfalse % Falzmarken
\@cutmarktrue % Schnittmarken
\makeatother
 
\newcommand{\mylabel}[2]{
\ticket{%
\put(15,80){\large \textit{Mitgliedsversammlung August--September 2015}}
\put(20,45){\Huge\bfseries #1}
\put(65,30){\Huge\bfseries #2}
\put(55,15){\Large \textit{Stimmkarte}}
}}
 
\begin{document}
\mylabel{Max Mustermann}{1}
\mylabel{Moritz Mustermann}{2}
\mylabel{Anna Mustermann}{3}
\mylabel{Tony Mustermann}{4}
\end{document}

stimmkarten-02

Uwe

Uwe Ziegenhagen likes LaTeX and Python, sometimes even combined. Do you like my content and would like to thank me for it? Consider making a small donation to my local fablab, the Dingfabrik Köln. Details on how to donate can be found here Spenden für die Dingfabrik.

More Posts - Website
Creating Dymo Labels with LaTeX

Today I purchased a Dymo 450 label printer. Of course I want to be able to print my labels from LaTeX, so I quickly created a test document.

Important: the correct label size must be set in the printer dialogue.

% For the 11354 label
\documentclass[14pt,ngerman]{scrartcl}
\usepackage[left=7.5mm,right=2mm,top=5mm,bottom=5mm,% 
paperwidth=57mm, paperheight=32mm]{geometry}
\usepackage[utf8]{inputenc}
\usepackage[T1]{fontenc}
\usepackage{babel}
\usepackage{palatino}
 
\setlength{\parindent}{0pt}
\setlength{\parskip}{0pt}
 
\begin{document}
 
Max Mustermann \\ Musterweg 1 \\ 12345~Musterstadt
 
\end{document}

label1

Uwe

Uwe Ziegenhagen likes LaTeX and Python, sometimes even combined. Do you like my content and would like to thank me for it? Consider making a small donation to my local fablab, the Dingfabrik Köln. Details on how to donate can be found here Spenden für die Dingfabrik.

More Posts - Website
„LaTeX Beginner’s Guide“ for free

Stefann Kottwitz, the autor, told me today that his „LaTeX Beginner’s Guide“ would be available for free today. More information is available from
LaTeX-Community.org or Packt

LaTeX Beginner's Guide

Uwe

Uwe Ziegenhagen likes LaTeX and Python, sometimes even combined. Do you like my content and would like to thank me for it? Consider making a small donation to my local fablab, the Dingfabrik Köln. Details on how to donate can be found here Spenden für die Dingfabrik.

More Posts - Website

Looping with LaTeX — Generating Name Cards

Today I had to generate a few name cards, LaTeX and the pgffor command came very handy doing that. I am not entirely satisfied with this solution, since the margins are hardwired, so if you have a better way just tell me.

\documentclass[45pt,ngerman]{scrartcl}
\usepackage[left=1cm,right=1cm,top=1.5cm,bottom=0.5cm,a4paper]{geometry}
\usepackage[utf8]{inputenc}
\usepackage[T1]{fontenc}
\usepackage{babel}
\usepackage{pgffor}
\usepackage{tikz}
\usepackage{xcolor}
\usepackage{lmodern}
\usetikzlibrary{positioning}
\pagestyle{empty}
\setlength{\parskip}{0pt}
\begin{document}
\centering

\foreach \x in {Manfred Mustermann, Gabi Mustermann, Manuela Mustermann}{
\begin{tikzpicture}
[mybox/.style={rectangle,black,xshift=0cm,yshift=0cm,minimum width=0.975\textwidth,font=\bfseries,draw=black,very thick,align=center, minimum height=0.475\textheight}]
\node at (0,0) [mybox] {\x};
\node at (0,0.475\textheight) [mybox] {};
\end{tikzpicture}\clearpage}

\end{document}

dann

Uwe

Uwe Ziegenhagen likes LaTeX and Python, sometimes even combined. Do you like my content and would like to thank me for it? Consider making a small donation to my local fablab, the Dingfabrik Köln. Details on how to donate can be found here Spenden für die Dingfabrik.

More Posts - Website
Reading CSV files with LaTeX

Reading CSV files is pretty easy in LaTeX, thanks to Nicola Talbot’s datatool package.

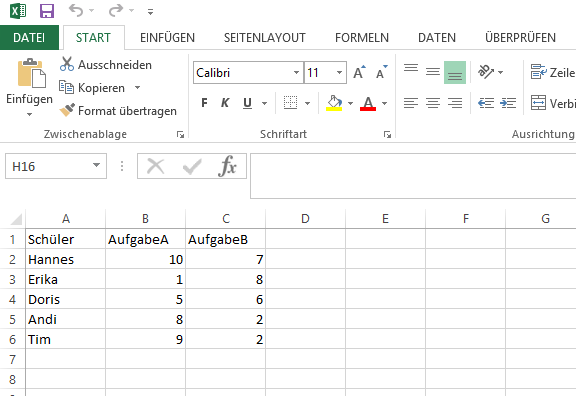
When you have an Excel file like the following Schueler.xlsx, simply save it as CSV (Comma-Separated Value).

excli

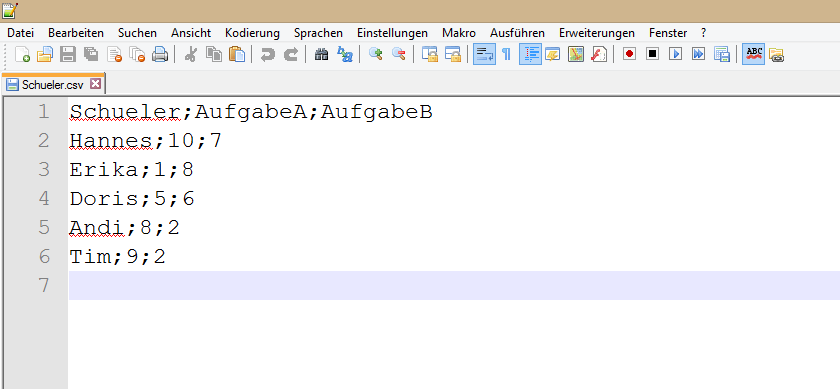
If you open the CSV file „Schueler.csv“ in a text editor you get the following:

excli2

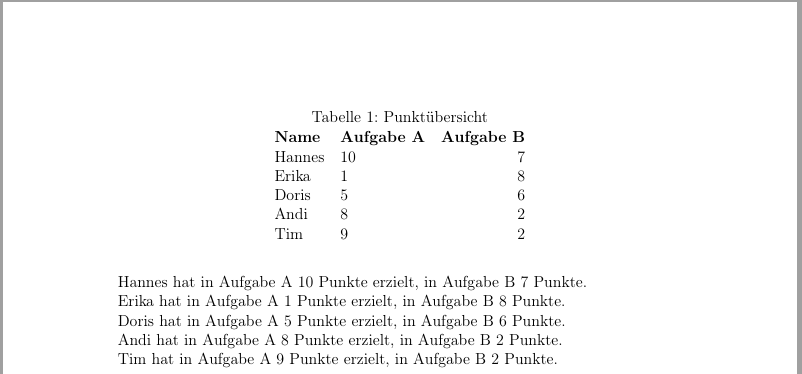
We start by loading the datatool package. Since the German Excel uses semicolons as column separator, we are required to manually set the delimiter. In the next line we tell LaTeX to use our Schueler.csv file and to reference it as „scores“. In the DTLforeach commands the magic happens. The command has three parameters:

  • the file reference
  • the assignment of the file headers to LaTeX commands
  • the loop where the output for each row is defined
\documentclass[12pt,ngerman]{scrartcl}
\usepackage[utf8]{inputenc} 
\usepackage[T1]{fontenc}
\usepackage{babel}

\usepackage{datatool}

\DTLsetseparator{;}
\DTLloaddb{scores}{Schueler.csv}

\begin{document}

\begin{table}
\caption{Punktübersicht}
\centering
\begin{tabular}{llr}
\bfseries Name &
\bfseries Aufgabe A &
\bfseries Aufgabe B %
\DTLforeach{scores}{%
\name=Schueler,\aufgabea=AufgabeA,\aufgabeb=AufgabeB}{%
\\
\name & \aufgabea & \aufgabeb }
\end{tabular}
\end{table}

\DTLforeach{scores}{%
\name=Schueler,\aufgabea=AufgabeA,\aufgabeb=AufgabeB}{%

\name\ hat in Aufgabe A  \aufgabea~Punkte erzielt, in Aufgabe B \aufgabeb~Punkte.}


\end{document}

excli3

Uwe

Uwe Ziegenhagen likes LaTeX and Python, sometimes even combined. Do you like my content and would like to thank me for it? Consider making a small donation to my local fablab, the Dingfabrik Köln. Details on how to donate can be found here Spenden für die Dingfabrik.

More Posts - Website

Simple looping with LaTeX

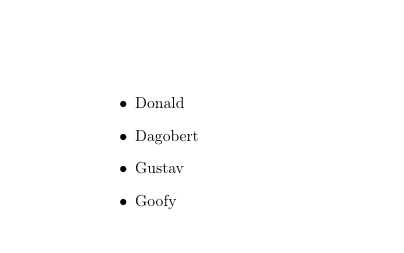
Here’s a fairly easy example how to loop through a LaTeX collection/list with the help of the pgffor package

\documentclass[12pt,ngerman]{scrartcl}
\usepackage[utf8]{inputenc}
\usepackage[T1]{fontenc}
\usepackage{babel}
\usepackage{pgffor}
\begin{document}

\begin{itemize}
\foreach \x in {Donald,Dagobert,Gustav,Goofy} {\item \x}
\end{itemize}

\end{document}

googy

Uwe

Uwe Ziegenhagen likes LaTeX and Python, sometimes even combined. Do you like my content and would like to thank me for it? Consider making a small donation to my local fablab, the Dingfabrik Köln. Details on how to donate can be found here Spenden für die Dingfabrik.

More Posts - Website

Checking TeX files for cite-errors

Today I had to TeX a longer file with numerous \cite[somestuff]{citekey} sequences, of which some had hard-to-spot errors (some ‚]‘ were missing). The following Python script checks if each \cite command has matching '[]' and '{}' sequences. I’ll probably extend this script to accept simple \cite{citekey} sequences that have no optional parameter.

#!/usr/bin/python
import re
 
with open('filetocheck.tex') as f:
	content = f.readlines()
 
index = 0
 
for a in content:
	index = index + 1
	if "cite"  in a: # check only lines that contain 'cite'
		matches = re.search(r'(.*)\[(.*)\]\{(.*)\}',a) # search for <sometext>[<sometext>]{<sometext>}
		if not matches:
			print (">>> Fail in row" , str(index), a)

Uwe

Uwe Ziegenhagen likes LaTeX and Python, sometimes even combined. Do you like my content and would like to thank me for it? Consider making a small donation to my local fablab, the Dingfabrik Köln. Details on how to donate can be found here Spenden für die Dingfabrik.

More Posts - Website